Overview
Overview
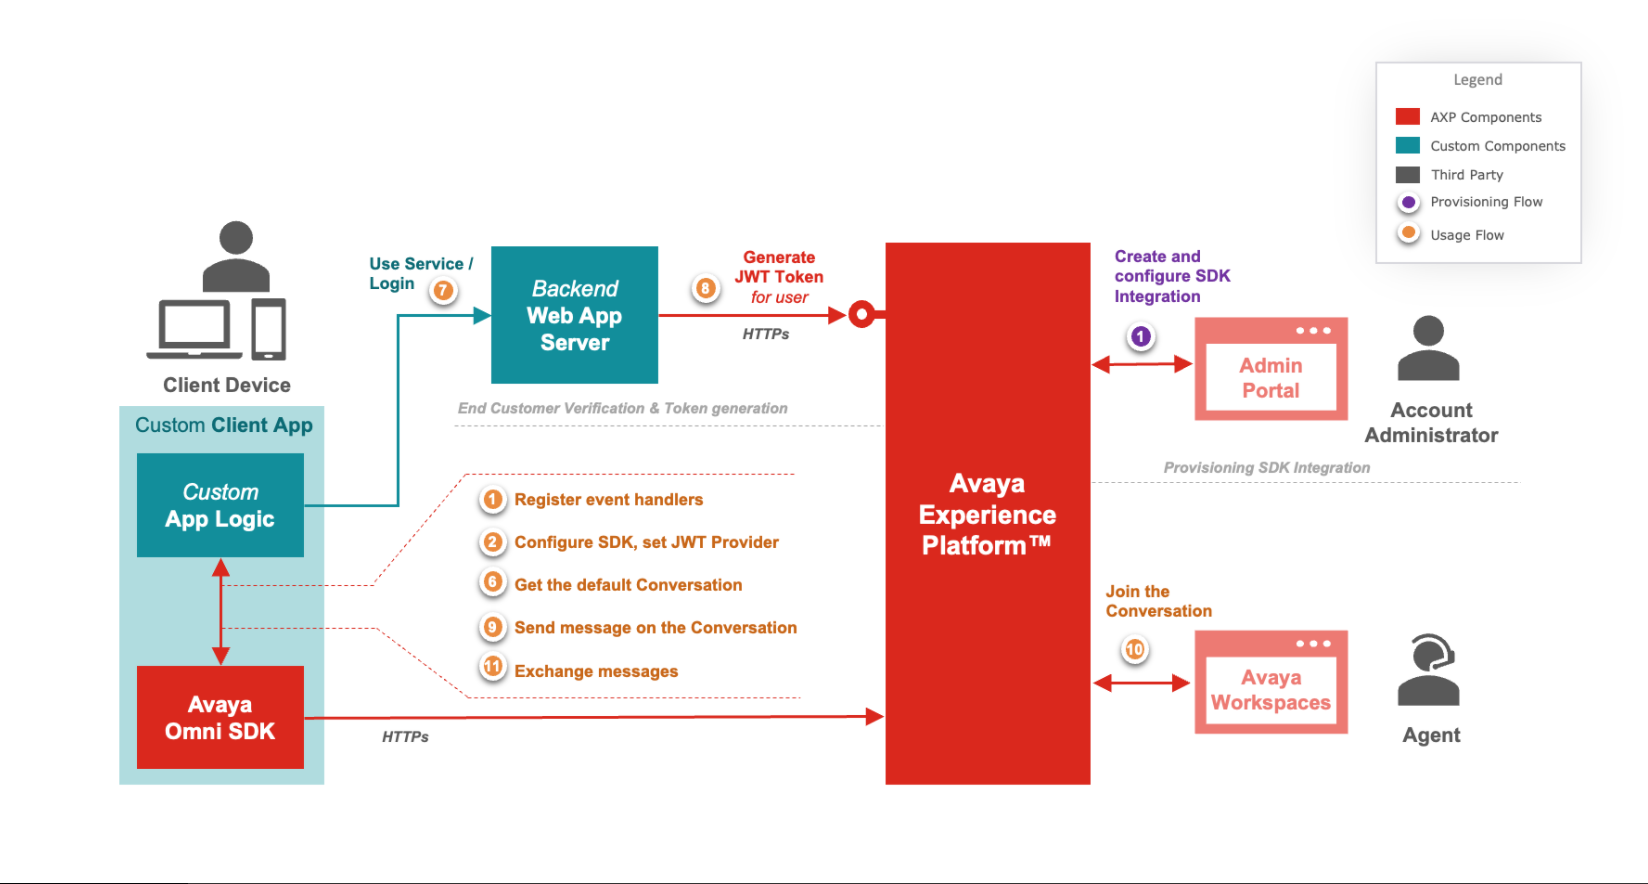
Integration with Avaya Experience Platform™ Omni SDK requires the following steps at a high level:
- Provision an Omni SDK Integration
- Understand how to enable your Backend Web App Service to authorize each end client using your Client Application to access Avaya Experience Platform™ capabilities
- Integrating your Client Application with Omni SDK to use Avaya Experience Platform™ capabilities.
The below image gives an overview of these steps and the following sections describe each step in detail
Configuring and enabling Custom Push Notifications is covered in detail here.
Provisioning an Integration
The Account Administrator must first create an Integration for the SDK. An Integration represents the entry point for conversations initiated through your applications (using the Omni SDK) meant for a business function. Various configurations that define how a conversation will be treated in the contact center, like routing queues, routing attributes, orchestration workflows and context data matching rules, are associated with the Integration. Multiple Integrations can be created in an Avaya Experience Platform™ Account to represent various business functions.
To create a messaging integration for the Omni SDK:
- Log in to your Avaya Experience Platform™ Application Center Administration as an account administrator.
- Navigate to
Omni SDK>Integrations - Click
Create Integrationon theIntegrationspage. - Provide the
Nameof the integration. - SelectYou can either select
MessagingorWebRTC Voicecheckboxes, or select both to include the services into your Integration. At least one of the services must be selected. - Click
Save. Once the integration is saved successfully, anIntegration Idis generated which you can view in the list of integrations or copy by opening the integration.
The value in this Integration Id field will be required by both the backend web application server (to generate the JWT) and the client (to initialize the Omni SDK).
Authorization
The Omni SDK requires a JSON Web Token (JWT) to connect to Avaya Experience Platform™ services. A unique token must be generated for each end user (your customers). Since your backend web application is aware of the user using your services, it should securely fetch the token from Avaya Experience Platform™ for the user whenever your application requires it.
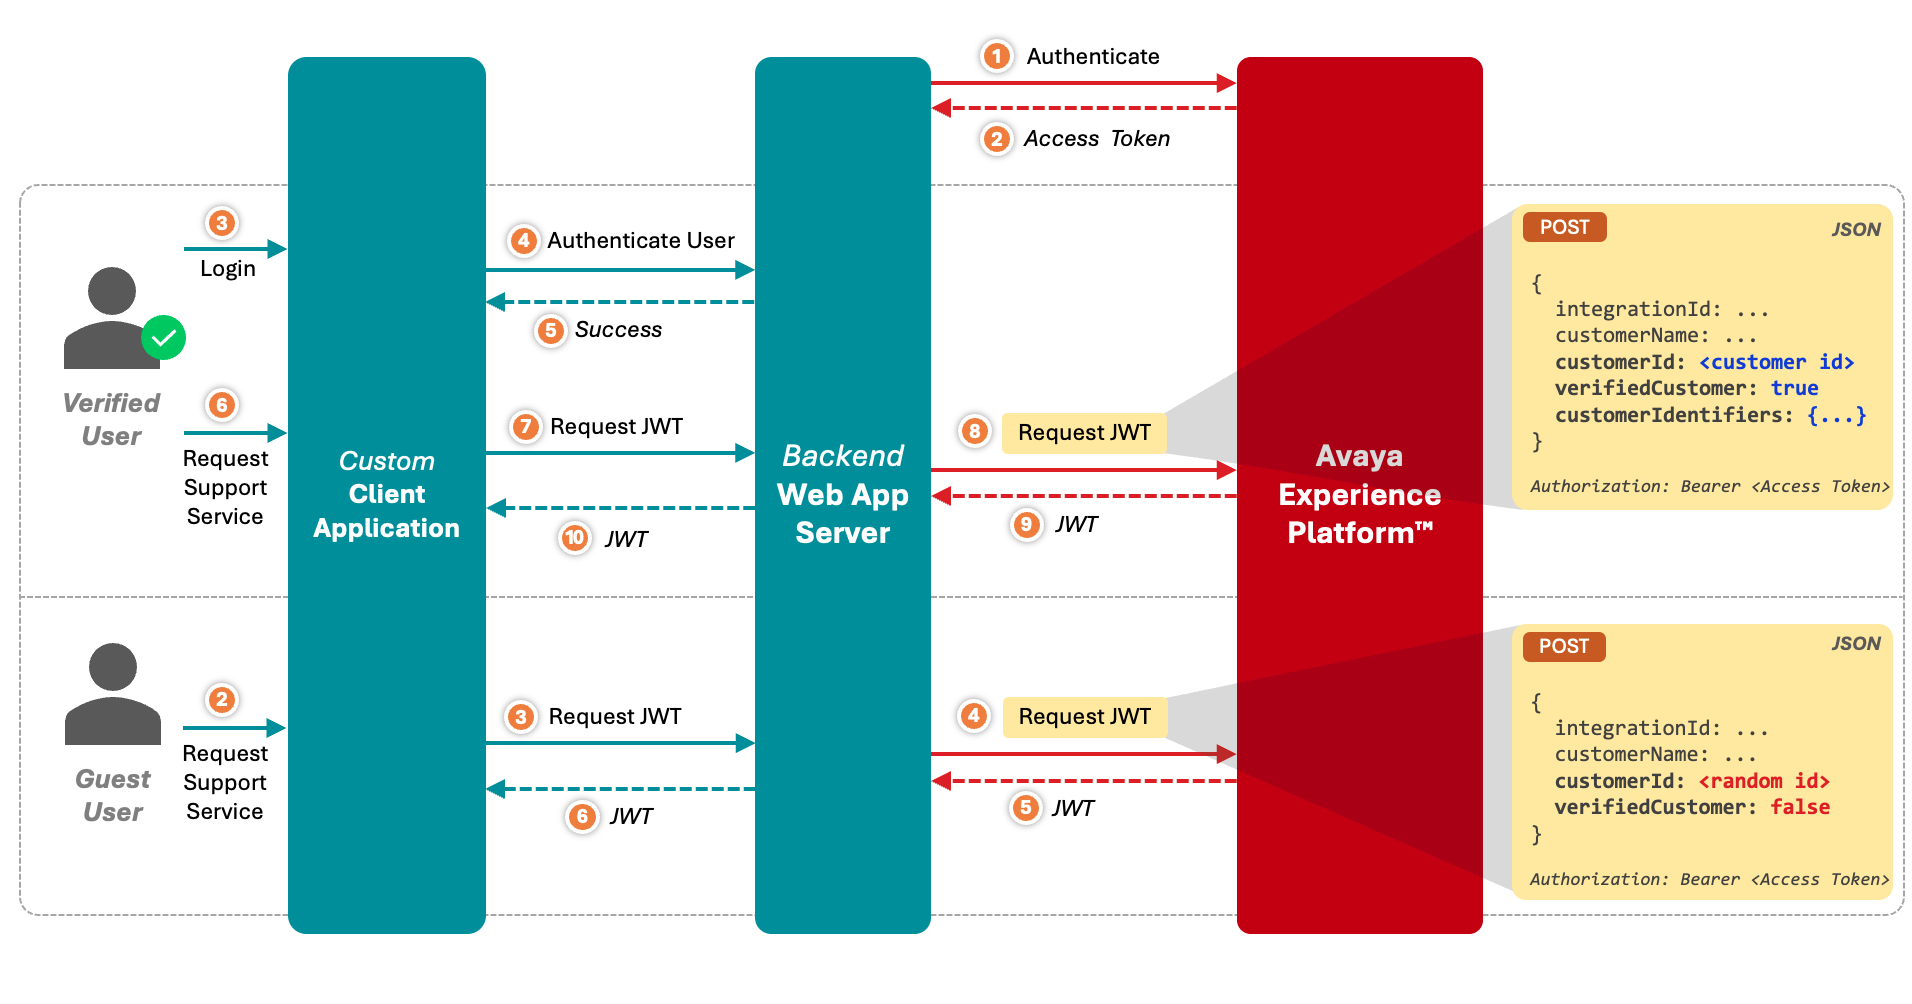
In order to fetch the JWT from Avaya Experience Platform™, the backend web application server needs to invoke the Generate JWT Token API. The backend web application server must authenticate and have a valid Access Token before using this API. See here for details. The Access Token or any credentials used to generate it should not be exposed to your client application or included directly into source code.
Users using your web application services can be categorized into verified (authenticated or logged-in) and unverified (guest) users.
While invoking the API to generate the JWT, the backend web application can specify if the token is being generated for a verified user by setting verifiedCustomer to true. For verified users, the backend web application must set the customerId to a value it uses to identify or trace the user so that Avaya Experience Platform™ is also able the trace multiple sessions of the same user. It should also pass valid information in the customerIdentifiers field so that Avaya Experience Platform™ is able to build the Customer Journey across multiple channels.
For unverified users, if the backend application does not have any id for the user, it can set the customerId to a random Id as customerIdentifiers are anyways ignored for unverified users.
The JWT is short lived and expires after 15 minutes (by default, expiry time can be set between 15 to 60 minutes while your Backend Web App server requests to create the JWT). Your client application must implement the JwtProvider interface of the Omni SDK. The 'fetchJwt()' method of this interface will be invoked by the SDK 3 minutes before the token is about to expire so that your application can request your backend web application for a new token and return it back to the SDK.
Sample Backend Web Application Server
To help you change your backend web application server to fetch JWT for your client applications, a sample backend web application is available for reference here. You can also run this Node.js application (after providing some basic configuration) to quickly test fetching JWTs for your Client Application. Note that this is just a sample application and not meant to be directly used in production.
Using the Omni SDK
Once you have implemented the JwtProvider interface to fetch the JWT from your backend web application service, you must configure the SDK the JWT and provide the required parameters like region, integrationId, instance of the implementation of JwtProvider, appKey, etc. Once the SDK is configured successfully, you can retrieve the default Conversation for the user that gets automatically created on Avaya Experience Platform™. The user can exchange messages and make calls on this Conversation. The default conversation of the user never ends and currently the only conversation user can use. If the user accesses your application from multiple devices and the same customerId is used while generating the JWT, the user will be able to view and resume the same default conversation from any of the devices.
The Omni SDK contains the following modules:
Core
Provides the basic functionality to configure the SDK and retrieve the default conversation of the user. Core establishes the session with Avaya Experience Platform™ for the end user.
Calling
Provides capability to make voice calls using WebRTC. This module is dependent on the Core module.
Messaging
Provides capability to send messages and listen to participant and message events on the conversation. This module is dependent on the Core module.
Messaging UI
Provides a built-in Messaging UI component to view the messages exchanged on the conversation and send messages or attachments. The module is dependent on Messaging and Core modules. The look and feel of the Messaging UI component is completely customizable so that you can blend it with your application’s theme. It takes cares of rendering all supported rich media types including sending responses when action buttons part of the rich media messages are pressed by the user. Using this module is the quickest and easiest way to enable your application with all messaging capabilities.
Combining the Modules
Each module is packaged as a separate library. You can select the modules that are necessary to meet your business requirements and include them exclusively into your client application. Since every module depends on the Core module, using any of the modules will need having the Core module included, either implicitly or explicitly.
Here are a few examples of scenarios:
-
Voice Only Integration
If your client application only needs to make WebRTC calls to AXP, you just need to include the following modules:
- Core module
- Calling module
-
Message Only Integration (with Built-in UI)
If your client application only needs to AXP Messaging capabilities, you need to include the following modules:
- Core module
- Messaging module
- Messaging UI module
-
Message Only Integration (without Built-in UI)
If you do not want to leverage the built-in Messaging UI provided by our Omni SDK, but only want to leverage the AXP Messaging using you own UI, you need to include the following modules:
- Core module
- Messaging module
-
Voice and Messaging Integration
If your client application needs both voice and messaging capabilities, you need to include the following modules:
- Core module
- Calling module
- Messaging module
- Messaging UI module
The following sections will help you get started on integrating your Android, iOS or Web Client Applications with Avaya Experience Platform™ Omni SDK
Updated 5 months ago