Chat Custom Integration
What is Chat Custom Integration?
Avaya Experience Platform™ Digital provides a Chat Channel to integrate your current chat solutions into Avaya Experience Platform™ using the following process documented below.
Prerequisites to Add a Chat Integration to Avaya Experience Platform™
Before we can start, you'll need to make sure you have a few things set up
You must be an Avaya Experience Platform™customer with Chat enabledIn order to test with the demo apps, you must be an Avaya Experience Platform™ customer with Chat enabled on your account. If you are not currently or lost your Chat credentials, please contact your Avaya representative.
You must have a Client ID and Secret Provided to you by Your Avaya Experience Platform™ Administrator or RepresentativePlease review How to Authenticate with Avaya Experience Platform™ APIs to continue
Chat Integration Overview
In order to support chat clients that require WebSocket or Long Polling to exchange messages and events, a Chat Connector can be built which on one hand provides an interface for WebSocket or Long Polling and on the other hand invokes Digital APIs for creating and handling client sessions and engagements for the end customer.
Overview Flow
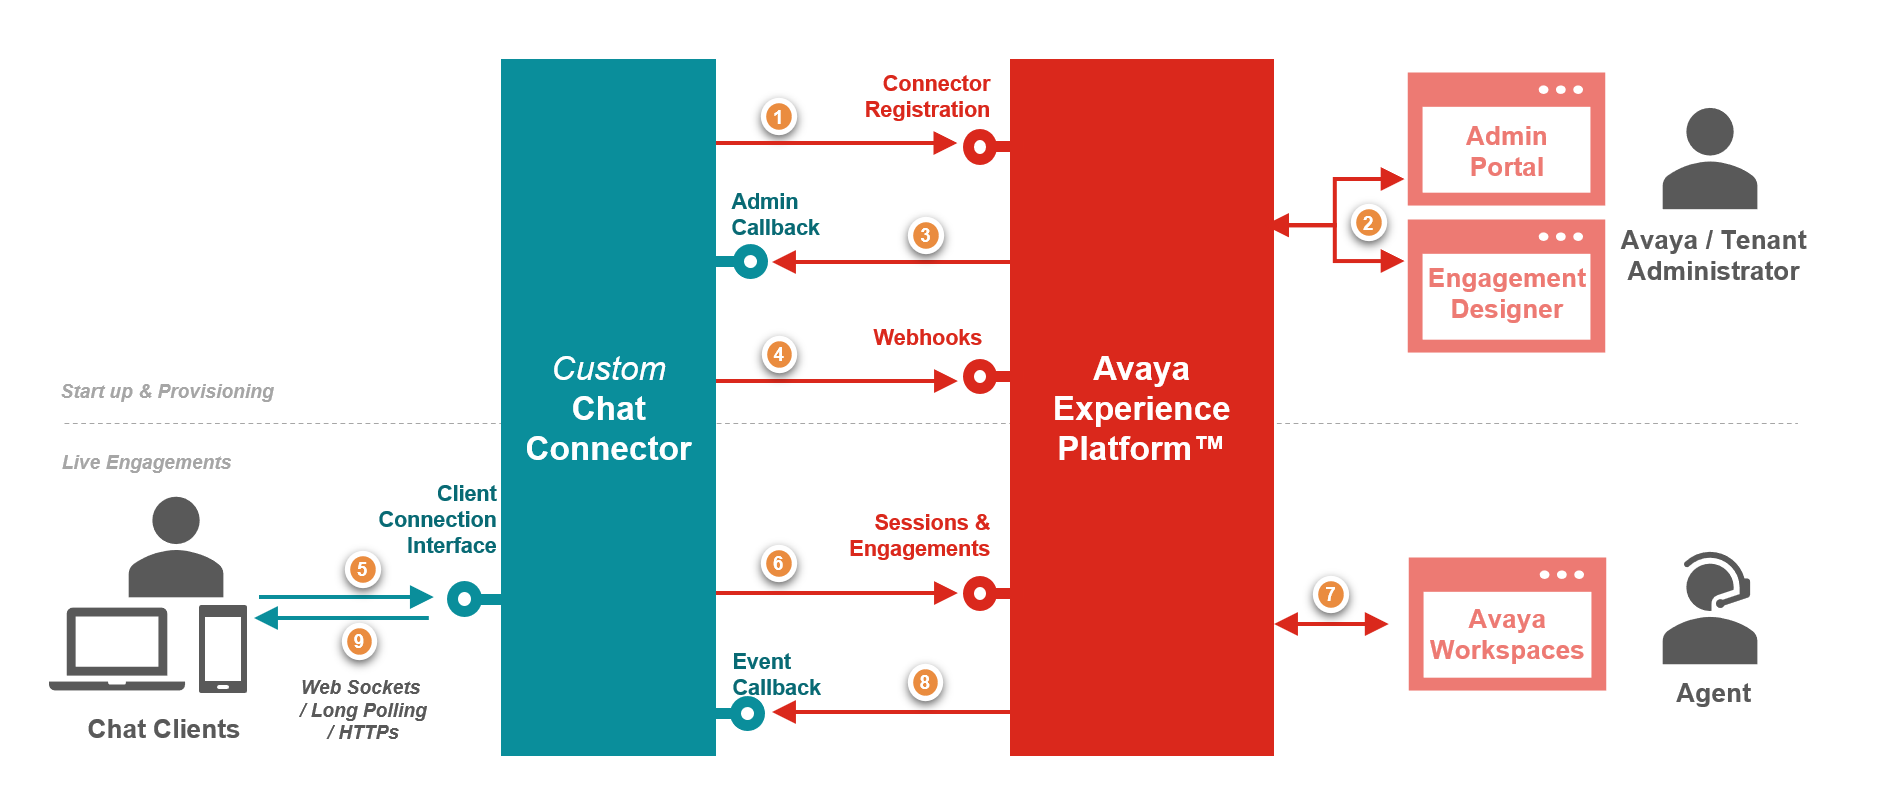
Chat Integration Overview
Chat Connector Startup and Provisioning (Steps 1-3 in Graphic Above)
First, we need to enable a Chat Element in the Avaya Experience Platform™ Administration. To do this you will need to do the following:
- Go to your Avaya Experience Platform™ Administration application
- Sign in as an Account (Tenant) Administrator
- Navigate to "Element Inventory" and select "New" > "Digital Connector" > "Chat"

- You will need to give your new Chat Connector Element:
- Name - Any name that you would like to give to your new Chat Connector Element
- Hostname - The hostname of where your Chat Connector will be hosted
- Callback URL - The callback URL of your Chat Connector
- Click "Save" once you have entered these

- Your new Chat Connector Element should appear within the list of Elements

Creation of Chat Connector Webhook (Step 4 in Graphic Above)
As the last step in enabling the Chat Connector, create a Webhook using the Create webhook API to subscribe for events related to sessions, engagements or messages. The Connector needs to expose REST endpoints and pass the URLs as Callback URLs along with the event type while creating the Webhooks. When an event related to engagement or messages occur, Avaya Experience Platform™ will call the Connector back on the callback URL registered for the specific event type with the entire event data.
Chat Session Handling
Now that you have successfully enabled a Chat Connector, you are ready to start building your Chat Connector to handle Chat Sessions between your Chat Application and Avaya Experience Platform™.
-
Once the Connector has completed its startup sequence, it should be ready to receive requests from the client application. When a customer opens the web or mobile native application, that client application can establish the connection to the Connector over the “Client Connection Interface” shown in the above image.
-
When the Connector receives requests from the client application, it can invoke the appropriate Digital APIs and send requests to Avaya Experience Platform™ to take action. Here is an example of how a chat session will progress:
- When a customer logs in to the web or mobile client application, the Connector can request to Create Customer Session using the correct Account ID, Client ID, and Secret
- While the customer is navigating the application, the interest points of the customer can be captured as context data and sent as requests to Update Session Parameters can be made
- When the customer starts a chat, the Create Engagement request should be invoked using the same session mentioned in the previous steps
- When the customer sends a message in the chat, the Connector should also send the message to Avaya Experience Platform™ using the same session and engagement
- After the customer is done with the chat and closes the chat window on the client application, a request to Disconnect Engagement must be sent
- After the customer logs out of the client application, terminate the session. The customer disconnecting the chat will also automatically disconnect the agent from the chat interaction
-
When an engagement is created, Avaya Experience Platform™ will queue the engagement and try to find the most appropriate agent who can handle the engagement based on the context data passed part of the session and engagement, matching attributes defined, and the Orchestration Workflow
-
Once the Agent is assigned the engagement, the Agent will see a work card alerting on Avaya Workspaces. Once the Agent accepts the work card, the Chat Widget is automatically loaded in Workspaces where the Agent can view messages sent by the customer and respond to them. Agents are also allowed to disconnect from the chat once they are done helping the customer. This will automatically disconnect the customer from the chat
-
As discussed earlier, Avaya Experience Platform™ will notify any events that occur for a session, engagement, or messages for an engagement to the Connector by invoking the Callback URL registered in a Webhook during the startup of the Connector
Updated 5 months ago