
Zendesk Setup
This chapter deploys the Zendesk sample bridge application in Zendesk Support. The app in this repository is a sample application — reference implementation and example code that illustrates CRM integration with Avaya Infinity.
These steps install the bridge application in Zendesk Support, enable API access, align agent statuses for omnichannel, and prepare contacts for CRM Directory.
Complete this host CRM setup before continuing in Avaya Infinity Configuration — assign CRM Configuration, enable features (click-to-dial, omnichannel, and so on), and assign the CRM Directory Infinity Element to users and queues. See Feature Walkthroughs for Infinity-side configuration.
1. Install the private Zendesk app
Zendesk documentation: Uploading and installing a private app · Manifest reference · Defining installation settings
The bridge application is delivered as a private Zendesk Support app — a ZIP package that Zendesk installs into Agent Workspace.
Upload the app
- Open Admin Center.
- Go to Apps and integrations → Zendesk Support apps.
- Click Upload private app.
- Select the app ZIP file and upload.
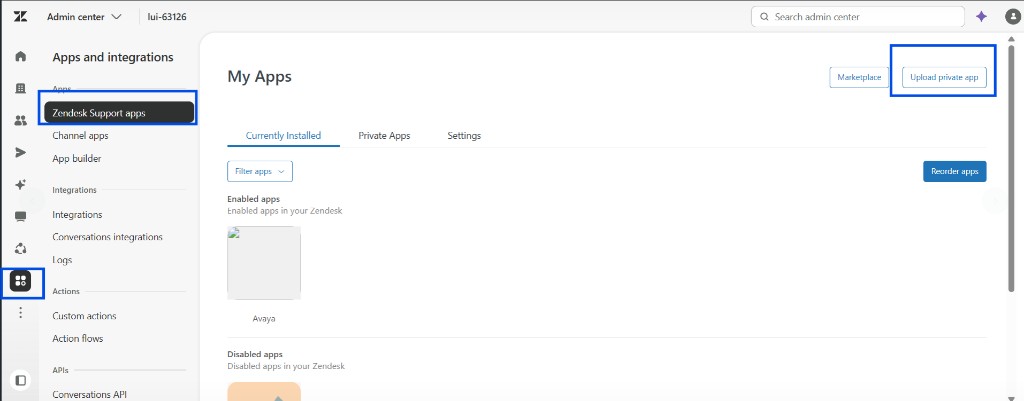
The ZIP must include the files Zendesk requires for a private app, at minimum:
| File | Purpose |
|---|---|
manifest.json | App metadata, install parameters, and location definitions (where the app appears in Support) |
translations/en.json | App display name and locale strings |
| Built app assets | HTML/JS/CSS served from the app URL (or referenced in the manifest) |
Use the ready-made Zendesk app package rungenerated.zip, or build your own from the sample (see Resources — Sample app ZIP):
| Package | When to use |
|---|---|
| rungenerated.zip | Bundled bridge assets. If the authentication page is not available, add *.zdusercontent.com to Keycloak — see CSP whitelist (Keycloak). If you do not have Keycloak admin access, raise a CloudOps ticket instead |
Build your own app assets
From the sample repository root, after npm install:
npm run build:zendeskCopy everything from dist/zendesk-sample-app/browser/ into the assets/ folder of your Zendesk app ZIP (along with manifest.json, translations/en.json, and location URLs such as assets/index.html).
This command generates the HTML, JavaScript, and CSS files intended for the Zendesk assets/ folder. It uses <base href="./"> so bundled scripts load correctly when Zendesk serves the app from *.zdusercontent.com. Do not use npm run build for Zendesk ZIP assets — the default production build sets <base href="/"> and the app may appear blank in Zendesk.
The package includes manifest.json defining Support app locations (where the app loads) and assets served from the ZIP. Build your own from the sample manifest.json if you deploy the bridge to a different environment.
Manifest: locations and Agent UI URL
In manifest.json, the location block defines where the bridge application opens in Zendesk Support — for example top bar, nav bar, ticket sidebar, and user sidebar.
You can configure URLs in two ways:
- In the manifest — set
urlunder each location (for exampleassets/index.htmlwhen the bridge is bundled in the ZIP). - Via install parameters — the sample manifest defines an
agentUiURLtext parameter. After upload, Zendesk shows this field in the app Settings tab. Enter the Avaya Infinity Agent UI URL there — the bridge application loads this URL in its nested iframe. The parameter name is historical; it is not the bridge application URL.
Example location block (from resources/rungenerated.zip):
"ticket_sidebar": {
  "signed": false,
  "url": "assets/index.html",
  "size": {
    "width": "200px",
    "height": "800px"
  }
}
The place where the application loads in Zendesk is defined in manifest.json inside the Zendesk app ZIP. See the manifest.json in resources/rungenerated.zip for a bundled-assets example.
Configure app settings after upload
If you use resources/rungenerated.zip or any package that relies on the agentUiURL install parameter:
- Open the installed app under Zendesk Support apps.
- Go to Settings.
- Enter the Agent UI URL — the URL of Avaya Infinity Agent (for example
https://<tenant>/app/agent/). The bridge application loads this in its nested iframe. 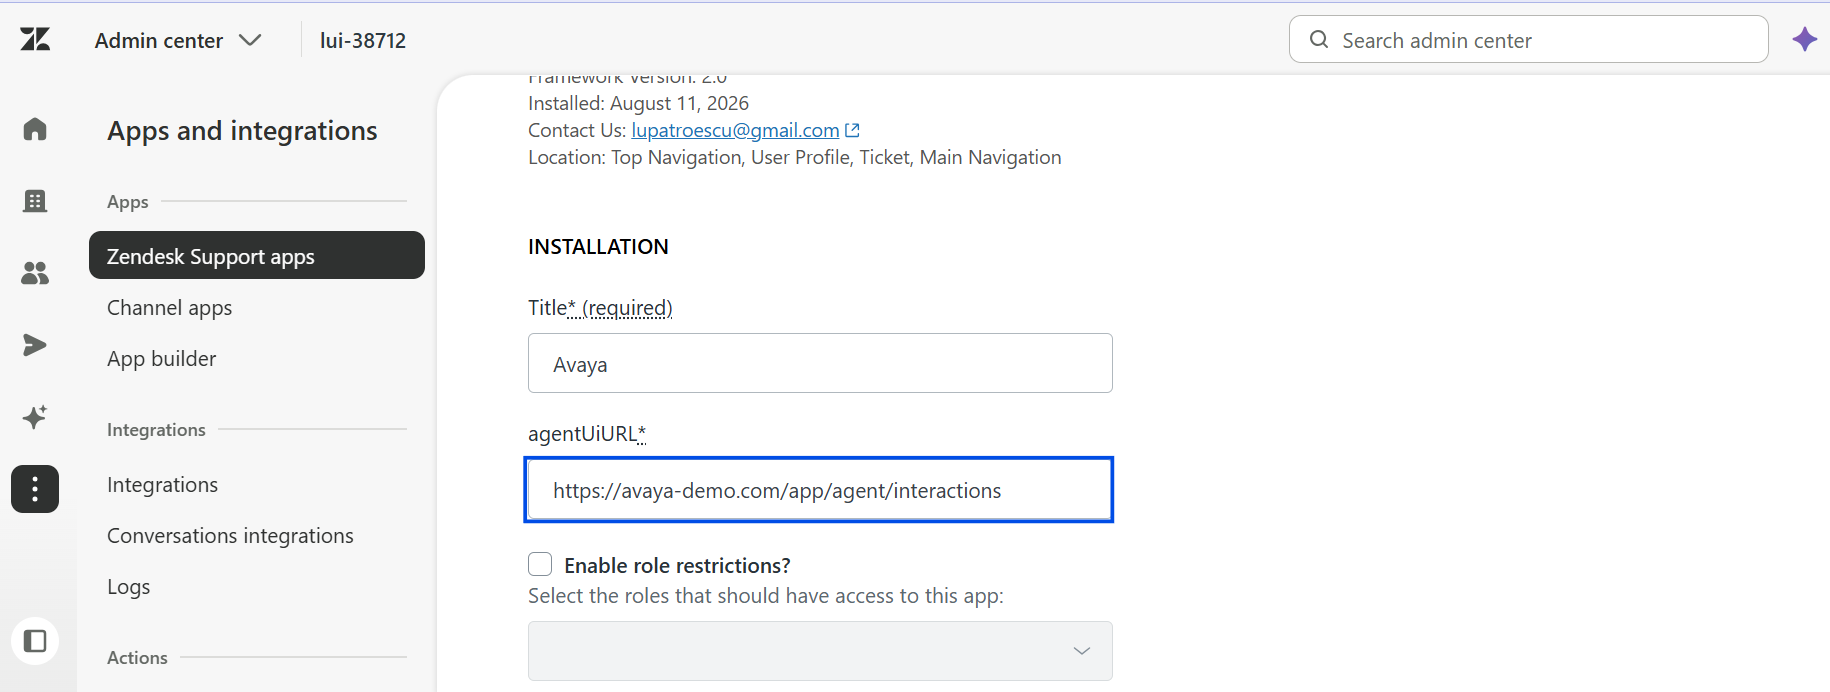
The app appears in the locations defined in the manifest (for example, ticket sidebar and top bar). Agents open it from there to start an Infinity session.
2. Enable API access
Zendesk documentation: Security and authentication · Migrating from API tokens to OAuth
The integration uses Zendesk REST APIs (for example agent availability, user lookup, and CRM Directory). Choose one of the following approaches depending on what your Zendesk account supports.
Option A — API token (legacy accounts)
Zendesk documentation: Turning on and off API access · Managing API token access
Enable token-based API access at the account level:
-
In Admin Center, go to Apps and integrations → API configuration.
-
Under API token access, enable Allow API token access.
-
Save.
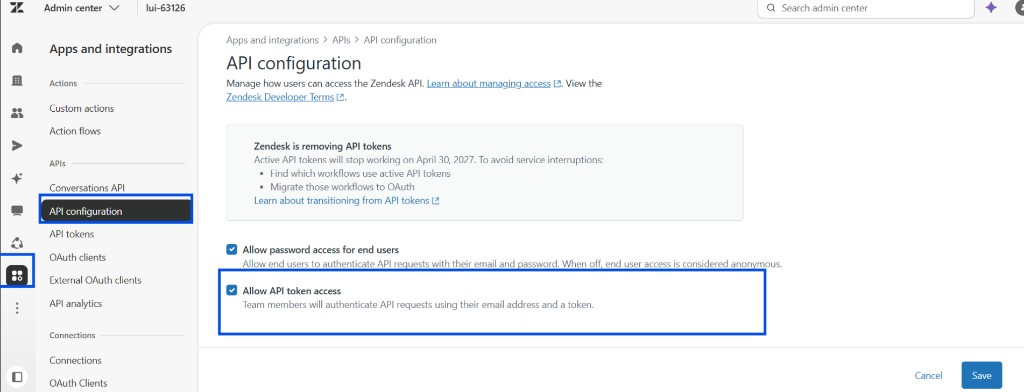
When API tokens are available:
- In the same area, open API tokens.
- Click Add API token.
- Enter a description (for example, Avaya Infinity CRM integration).
- Click Save.
- Copy the generated token and store it securely. Zendesk shows the full token only once.
Use this token when creating a Zendesk connection in Avaya Infinity configuration.
Note: Zendesk is moving new accounts away from API tokens toward OAuth. API token creation may not be available on new registrations.
Option B — OAuth client (new accounts)
Zendesk documentation: Registering your application with Zendesk · Managing OAuth token access · Client credentials flow
If API tokens are not available, create an OAuth client in Zendesk Admin Center:
-
In Admin Center, go to Apps and integrations → APIs → OAuth clients.
-
Click Add OAuth client.
-
Enter a Name and Description for the integration (for example, Avaya Infinity external integration).
-
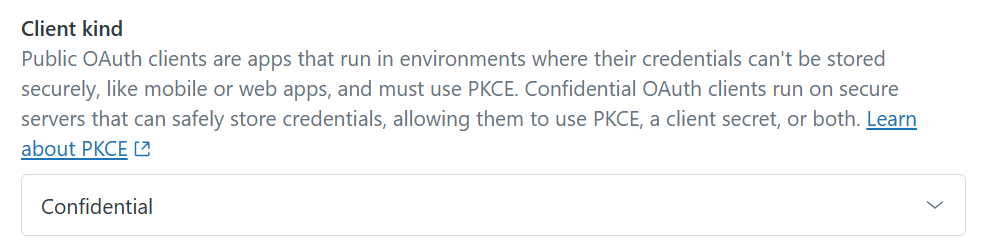
Set Client kind to Confidential — required for server-side OAuth with a client secret (
client_credentials). -
-
Set Identifier — this becomes your
client_id(for exampleavaya_infinity_external_integration). It must be unique and is used in code and authentication configuration, not shown to end users. -

-
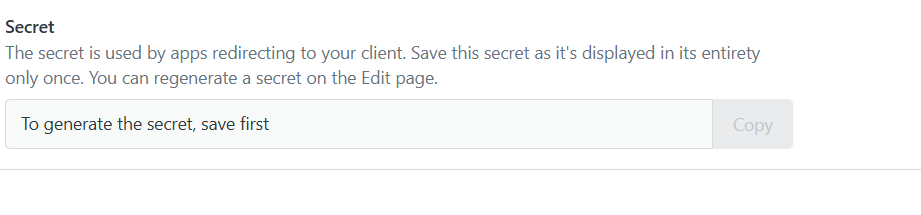
Click Save to create the client and generate the secret.
-
Copy the Secret immediately and store it securely. Zendesk shows the full secret only once. If the secret is not visible yet, save the client first — the secret is generated on first save.
-
-
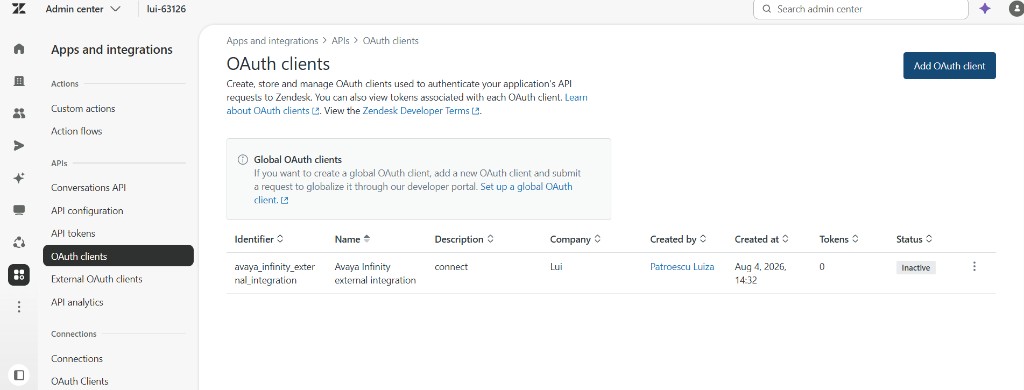
Confirm the client appears in the OAuth clients list.
-
Copy the Identifier (
client_id) and Secret (client_secret) and store them securely. Use them when you configure an Avaya Infinity Authentication Profile for screen pop Webhook workflows — see Feature Walkthroughs — Screen Pop — Authentication profile.
3. Configure agent statuses (omnichannel)
Zendesk documentation: About unified agent statuses · Managing unified agent statuses · Creating custom unified agent statuses
If omnichannel is enabled in Avaya Infinity CRM Configuration (Synchronized or Complementary), Zendesk agent status names must match the Infinity agent states used by the integration.
Status names are matched case-insensitively by display name (for example Available, Busy, Away, Offline).
Create or verify agent statuses
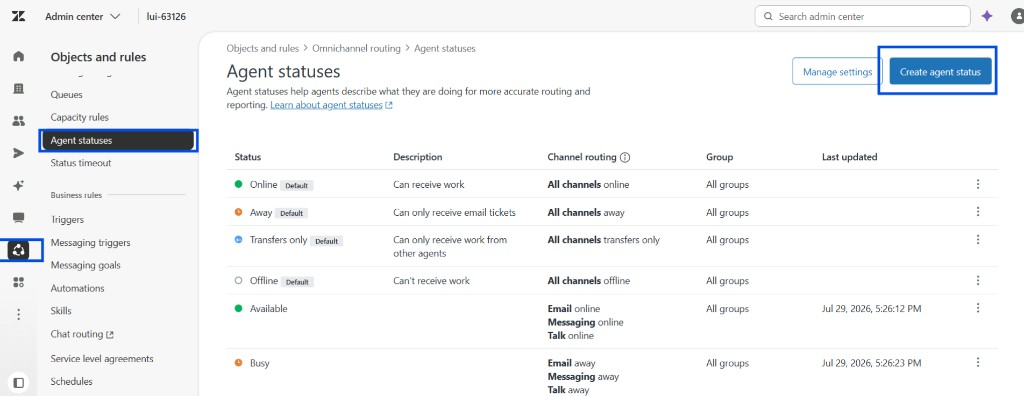
- In Admin Center, go to Objects and rules → Agent statuses (or Agent availability → Agent statuses, depending on your Zendesk plan and UI).
- Review existing default statuses.
- Create any missing statuses so Zendesk names align with Avaya Infinity — at minimum the states your agents use in Infinity, such as:
-
Available
-
Busy
-
Away (if used)
-
Offline
-
For Complementary omnichannel mode, also ensure the complementary default status configured in Infinity CRM Configuration (for example Busy) exists in Zendesk with the same name.
When names align, status changes in Avaya Infinity Agent can update Zendesk, and status changes in Zendesk can flow back to Infinity. See Feature Walkthroughs — Omnichannel for behavior after CRM Configuration is assigned.
4. Prepare CRM Directory contacts (team members)
Zendesk documentation: Adding agents and admins · Team members page · User profile — Phone · Users API
CRM Directory reads contacts from Zendesk users (agents and admins) and displays name and phone for outbound calls and consults.
Create team members
-
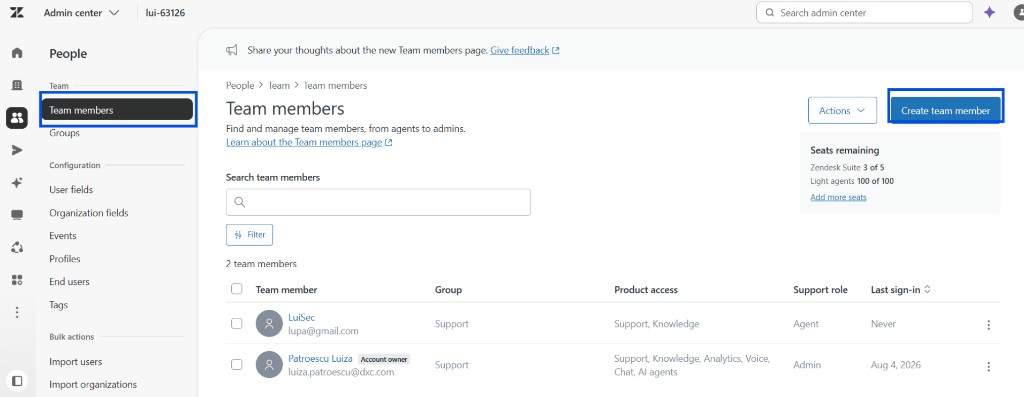
In Admin Center, go to People → Team members.
-
Click Create team member (or add an existing person as a team member).
-
Complete the profile and assign the appropriate Support role (agent or admin, as needed).
Add contact information in Support
For each directory entry to be dialable:
-
From Team members, open the actions menu (⋯) and choose Manage in Support.

-
On the user profile, click + add contact and choose Phone.
-
Enter a phone number and ensure the name is set — this is what agents see in CRM Directory in Avaya Infinity Agent.
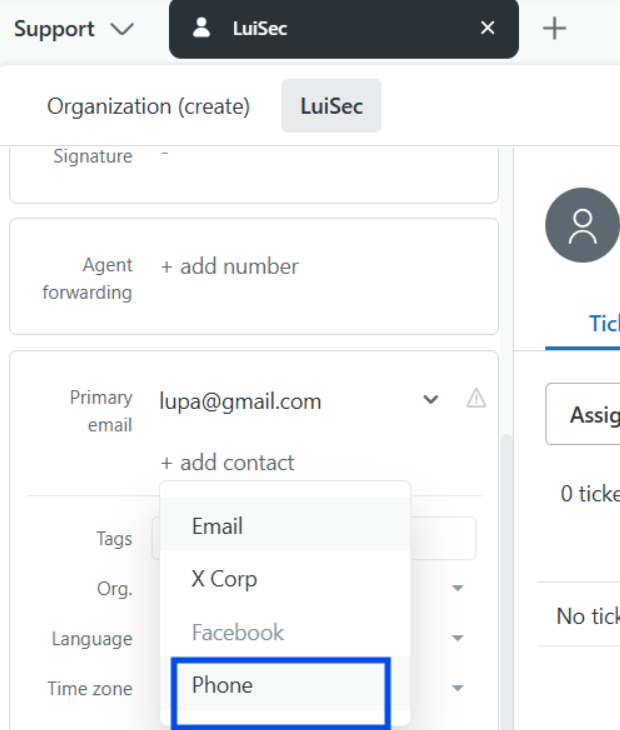
Only team members with a phone number on their Support profile appear in CRM Directory.
After Zendesk setup
Continue in Avaya Infinity Configuration:
- Assign CRM Configuration to users
- Enable features (click-to-dial, omnichannel, and so on)
- Assign the CRM Directory Infinity Element to users and queues
See Feature Walkthroughs and Configuration.
Where agents open Avaya Infinity
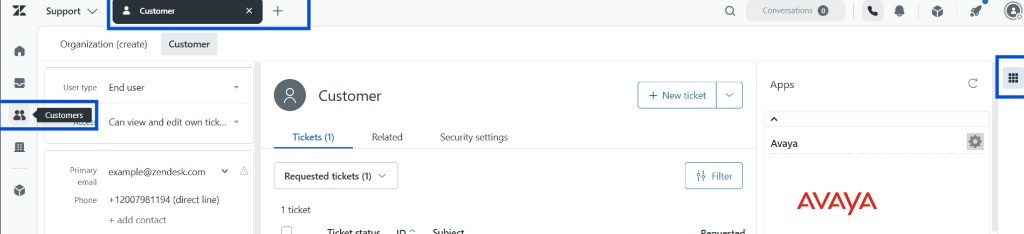
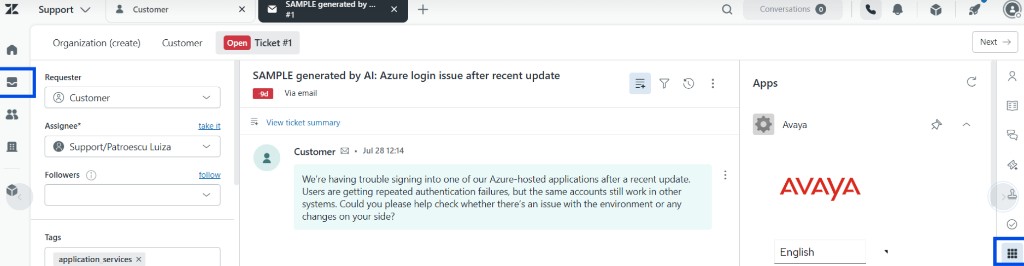
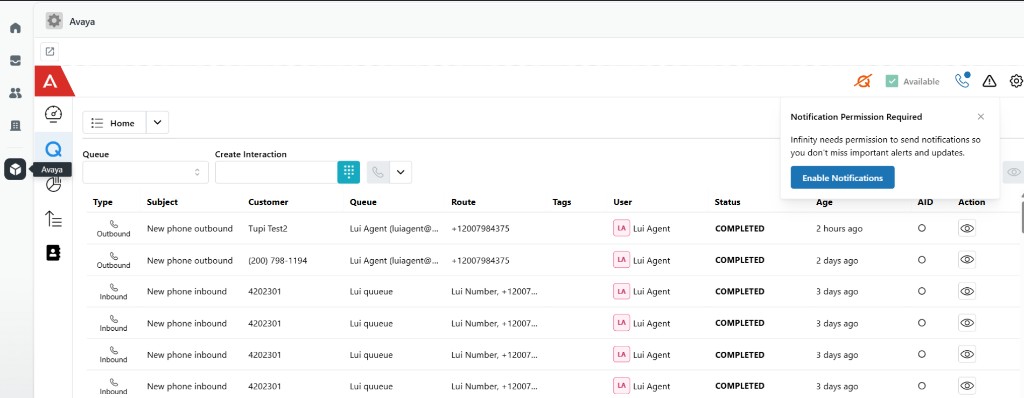
After setup, agents can open Avaya Infinity from the Zendesk locations defined in manifest.json. Each view below corresponds to a key under location.support:
Customers / Contacts — user_sidebar
Opens from the Apps panel on a user or contact profile (Customer tab).
Tickets — ticket_sidebar
Opens from the Apps panel on a ticket.
Sidebar — nav_bar
Opens from the left navigation bar.
Resources
Resources — Bundled resources (rungenerated.zip, crmdirectoryh.html) | Host CRM Integration | Feature Walkthroughs | Configuration
Updated about 2 months ago