
Feature Walkthroughs
How to enable and use each CRM feature with Avaya Infinity Agent in the host CRM: click-to-dial, click-to-consult, screen pop, omnichannel, and CRM Directory.
For Zendesk Support host CRM setup (private app install, API access, agent statuses, CRM Directory contacts), complete Zendesk Setup first.
Click to Dial and Click to Consult
These features must be enabled in the CRM configuration, and that configuration must be assigned to the user/agent.
Enable features in CRM Config
In Avaya Infinity Configuration, open CRM Configuration and turn on:
- Click to Dial
- Click to Consult
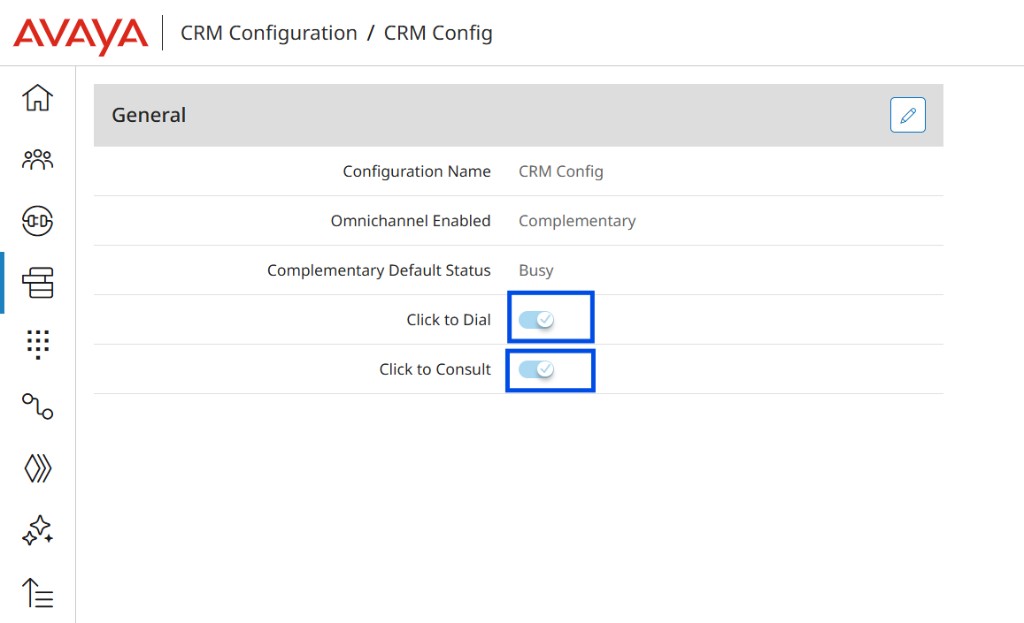
Assign the configuration to the agent
On the user/agent page, set CRM Configuration to the configuration you enabled (for example, CRM Config).
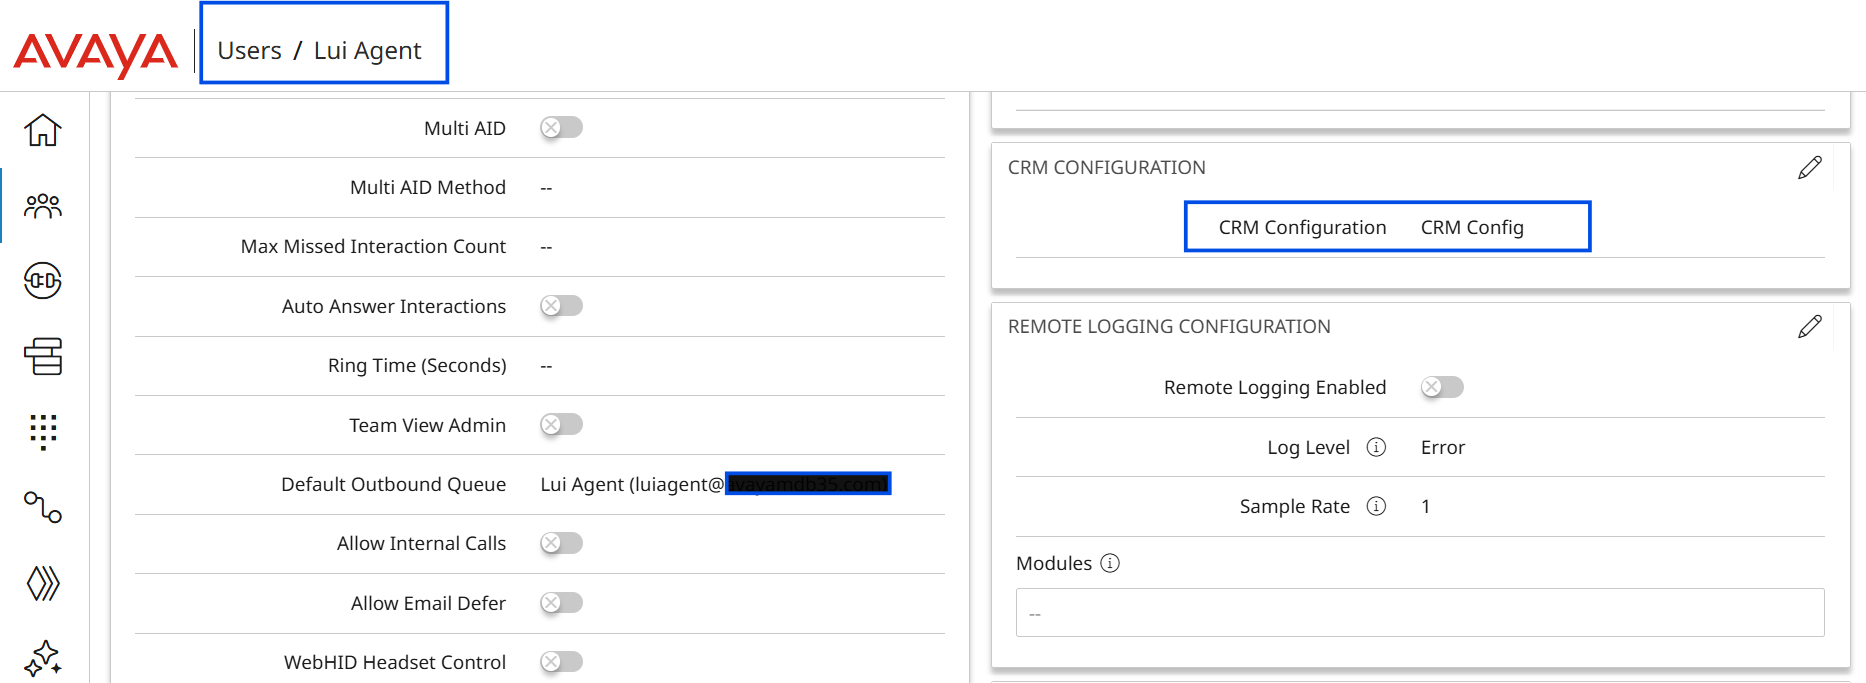
Until both steps are done, click-to-dial and click-to-consult will not run for that agent.
See Configuration for CRM Configuration settings.
Click to Dial
The agent has no active interaction, and the click to dial option is enabled.
- Click the phone number on the customer record in the host CRM.
- The system performs the click-to-dial action.
- A new outbound call is created on the default outbound queue.
- Avaya Infinity Agent shows the interaction starting and moving to connected.
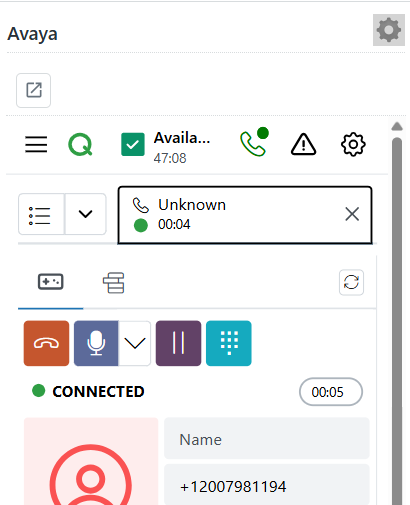
For the postMessage and Element API flow, see Click-to-dial.
Click to Consult
The agent has an active interaction, and the click to consult option is enabled.
- With a connected interaction open in Avaya Infinity Agent, click the phone number again in the host CRM.
- The system switches to the click-to-consult flow and creates a consult call.
- The original caller is placed on hold, and the consult destination becomes the active call.
- The widget shows the consult options:
- Complete Transfer
- Conference Call
- Cancel
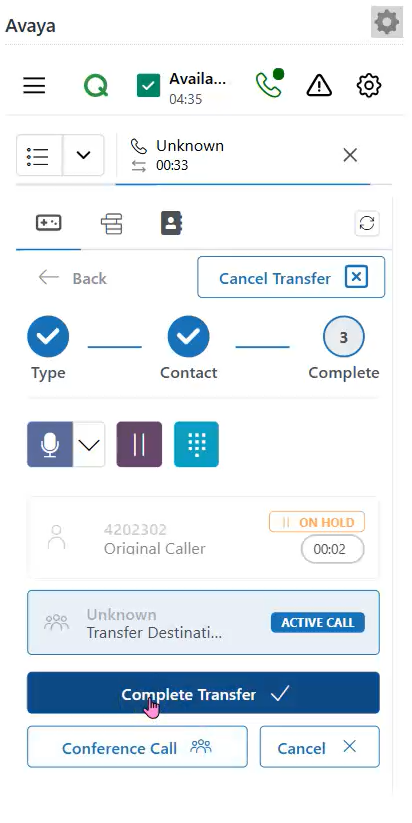
For the postMessage and Element API flow, see Click-to-consult.
Screen Pop
Open matching host CRM records when an interaction connects. Screen pop is driven by Avaya Infinity workflow configuration, not a CRM Configuration feature flag.
1. Authentication profile
Before creating the workflow, create an Authentication Profile under Integrations for your host CRM connection (for example OAuth client_credentials with token endpoint, client ID, and client secret for your CRM API). The Webhook module in the workflow uses this profile to authenticate CRM API requests.
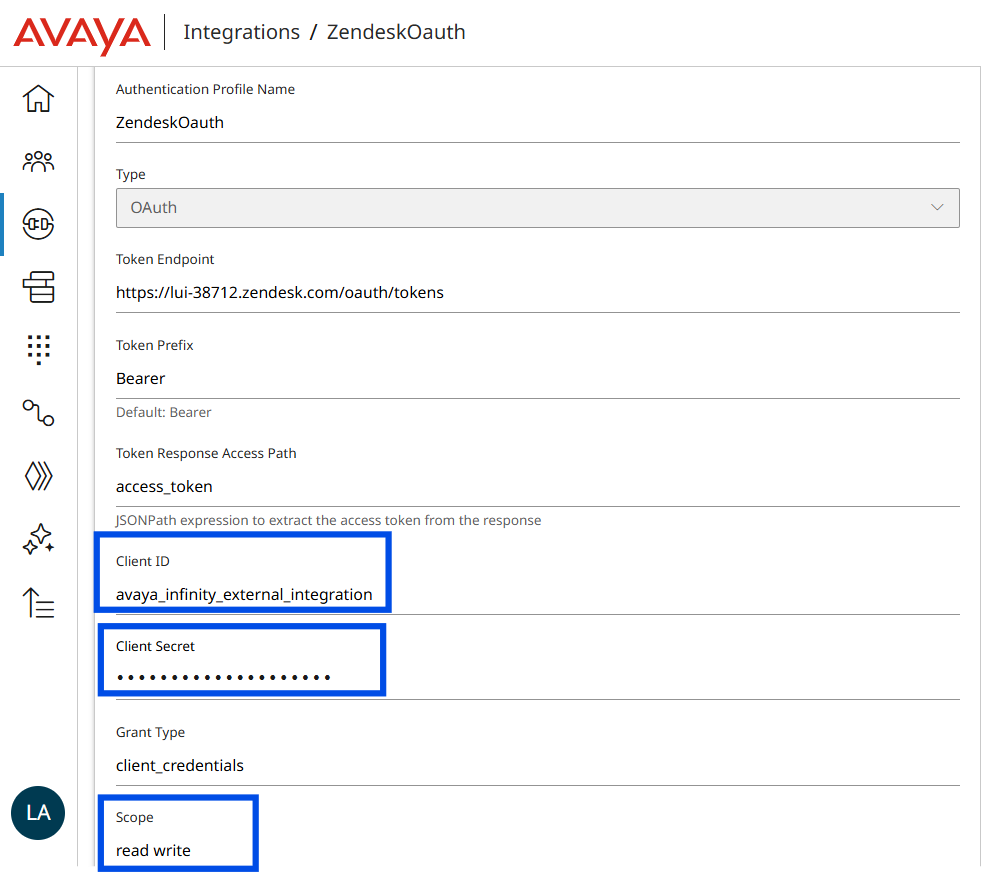
Add Scope if required by your CRM (for the Zendesk sample, use read write) so the access token can call Support API endpoints from the Webhook module.
2. Workflow setup
Configure a workflow that retrieves host CRM record data and attaches it to the interaction.
Create the workflow
Create a workflow that calls the host CRM and writes the response to the interaction — for example Start → Webhook → Update Interaction → End:
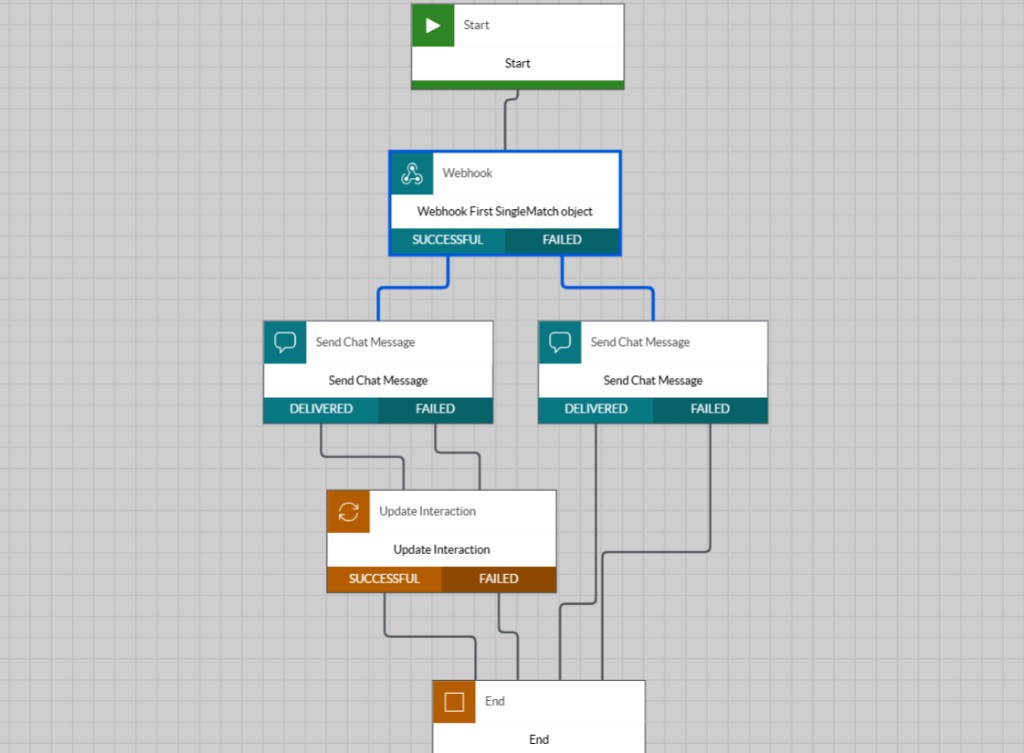
Webhook module
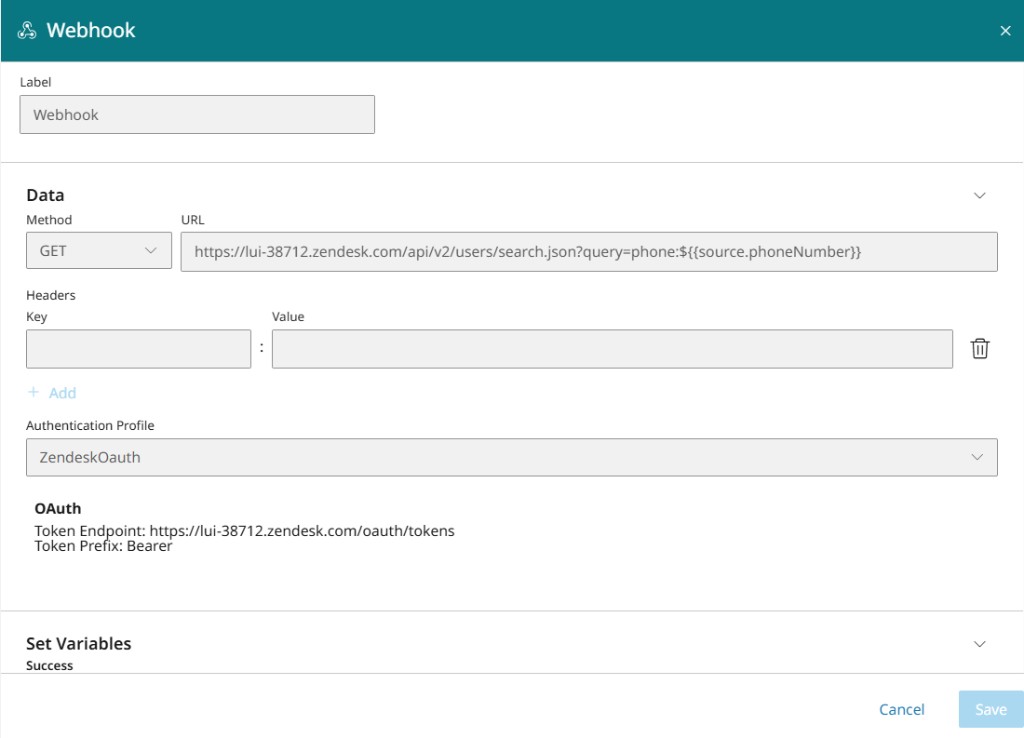
Add a Webhook module to request data from the host CRM:
- Set Method and URL for your CRM query (for example GET a contacts or search endpoint).
- Select the Authentication Profile from step 1.
- Add any required Headers.
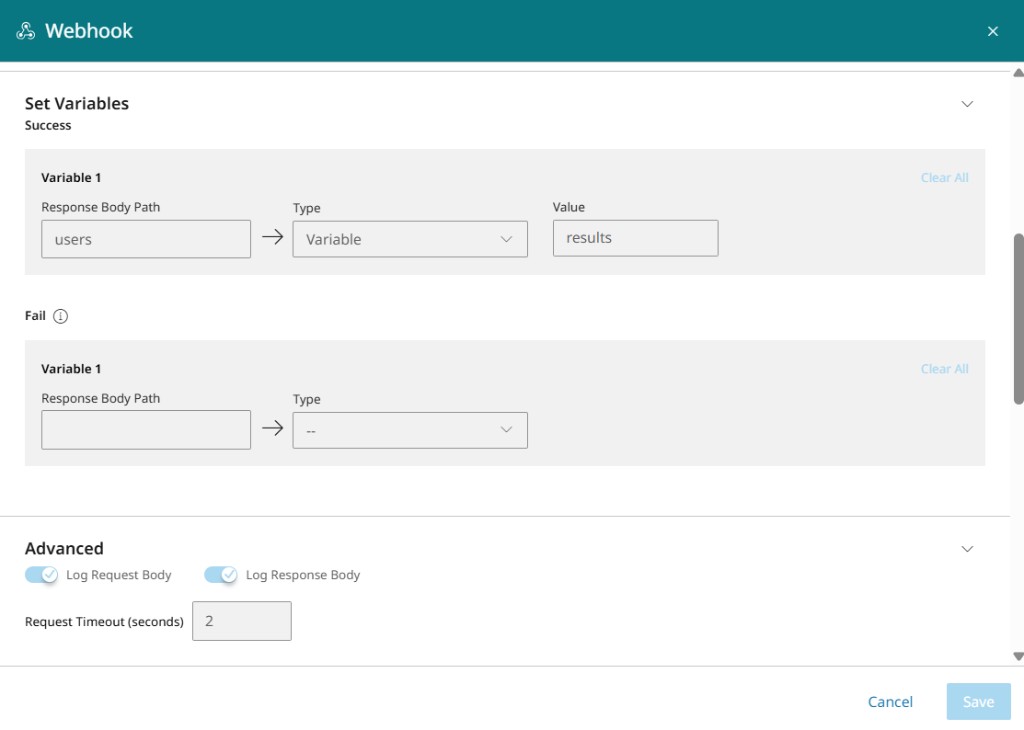
Use Set Variables to map fields from the response body into workflow variables. Record IDs are the most important mapping for screen pop — map the CRM record id (and any other fields your Host CRM integration expects under custom.crm). You can map all returned values if required.
Use Simulate on the Webhook module to test the request and variable mapping before saving the workflow. Enter sample values for workflow variables (for example source.phoneNumber), click Run, and confirm the Response tab shows a successful result with the expected record IDs in your results variables — this verifies your OAuth Authentication Profile, URL, and variable mapping before you attach the workflow to a queue.
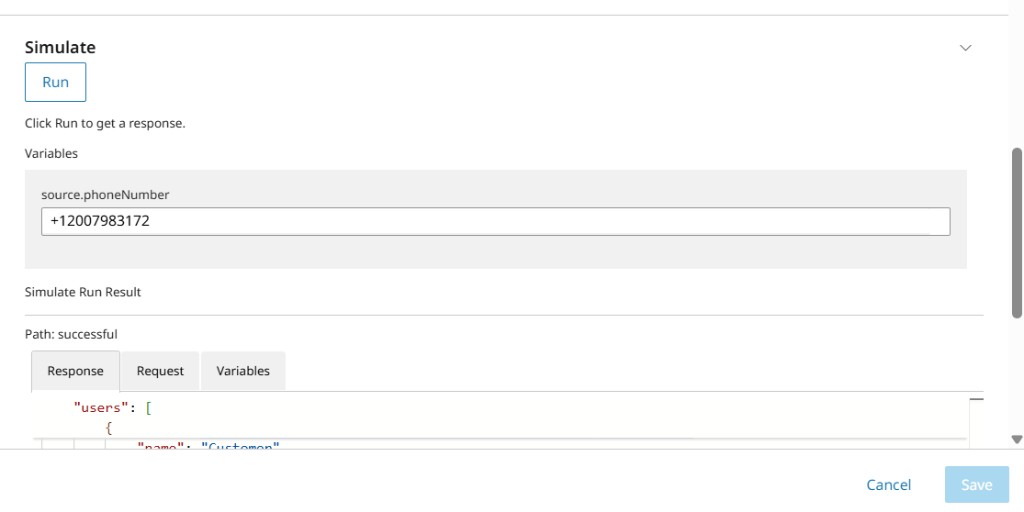
Example (Zendesk): map users → results. The bridge reads user id values from custom.crm.zendesk on the interaction for screen pop.
Optional — CRM connection integration
If your environment has a connection integration configured for the host CRM, you can add that module before Update Interaction instead of using a Webhook — for example a Look Up module wired to the same integration. Use this path only when that integration is available; otherwise retrieve data through the Webhook step above.
Add a Look Up module and configure the search criteria for your host CRM integration.
Use Set Variables to map fields from the lookup results into workflow variables. Record IDs are the most important mapping for screen pop:
- Set Variables (single result) — map returned field
id→results.ID(or your single-result variable path). - Many Results Set Variables — set Array Variable Name to
resultsand map returned fieldid→IDfor each item.
You can map additional returned fields if your Host CRM integration needs them.
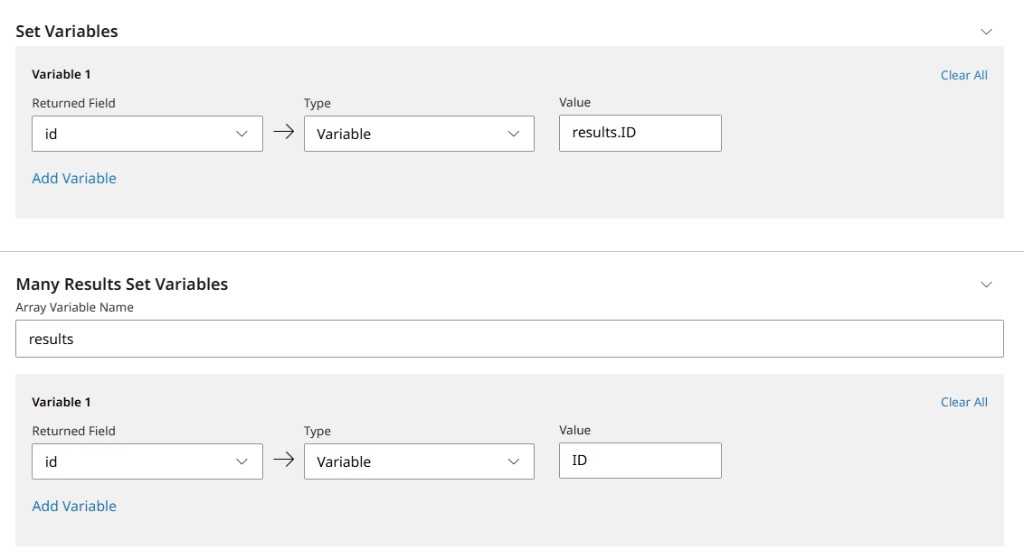
Use Simulate on the Look Up module to test the search and variable mapping before saving the workflow. Enter sample values for workflow variables (for example source.phoneNumber), click Run, and confirm the response includes the expected record IDs in results.
Update Interaction
Use Update Interaction to write the workflow results to interaction fields — map them however your Host CRM integration expects. Set the action to Interaction Data Reload so the Generic CRM interface receives the updated interaction.
When you add or name an Interaction field (for example custom.crm), click Create after entering the field name so the variable is saved before you map workflow data to it.
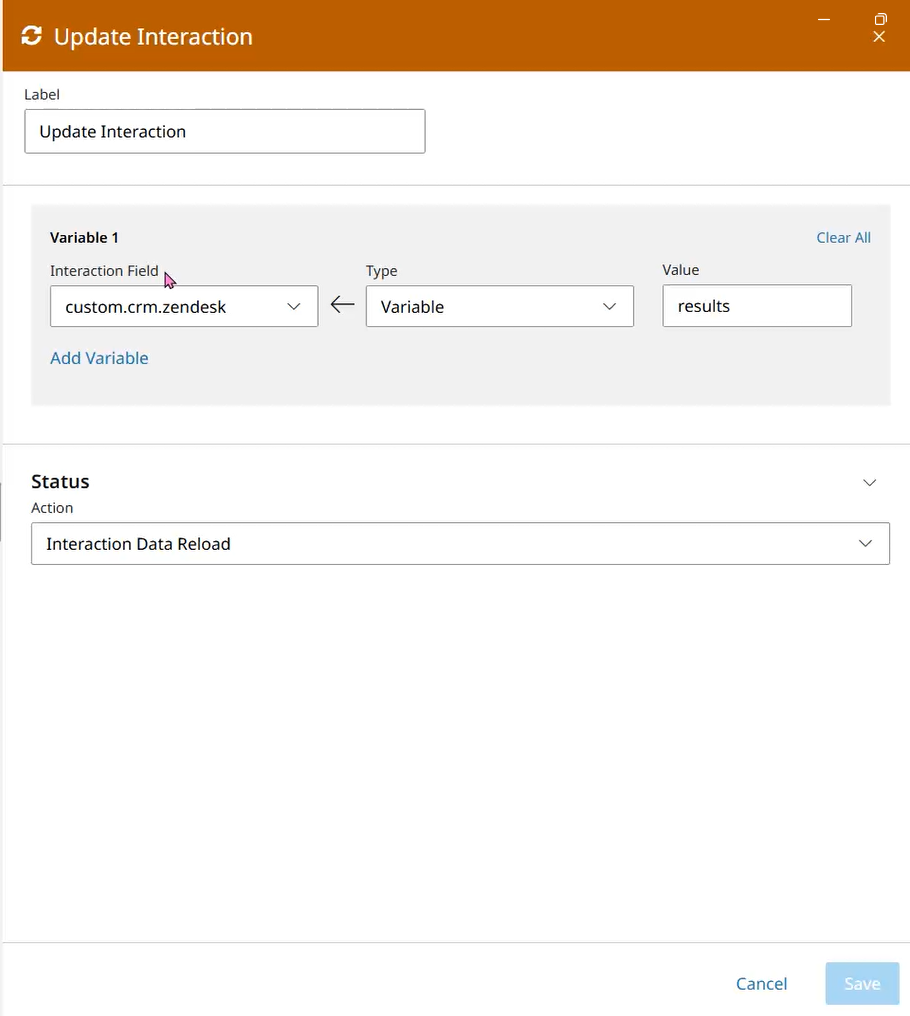
See Screen pop and workflow configuration for how workflow data maps to the screen pop payload.
3. Queue configuration
Attach the workflow to the queue on the Connected status. When an interaction connects, the workflow runs automatically and provides the values needed for screen pop.
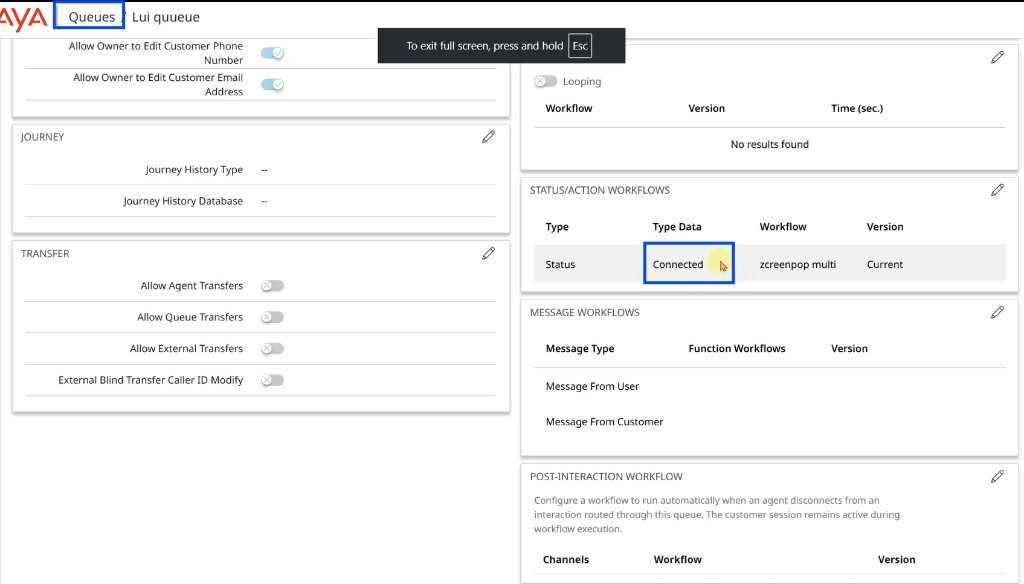
4. Demonstration
Trigger an inbound call. As the call connects:
- The workflow executes and retrieves matching record data from the host CRM (via Webhook or optional CRM connection integration).
- Contact IDs are attached to the interaction.
- The Generic CRM interface posts
screenPop:interactionto the Host CRM integration. - The host CRM opens the matching contact records — if multiple contacts match, multiple tabs can open.
For the postMessage and Element API flow, see Screen pop.
Omnichannel
Omnichannel must be enabled in the CRM configuration, and that configuration must be assigned to the user/agent.
1. CRM configuration
In Avaya Infinity Configuration, open CRM Configuration and set Omnichannel Enabled to one of:
- No — no omnichannel
- Synchronized
- Complementary
For synchronized mode, set Omnichannel Enabled to Synchronized:
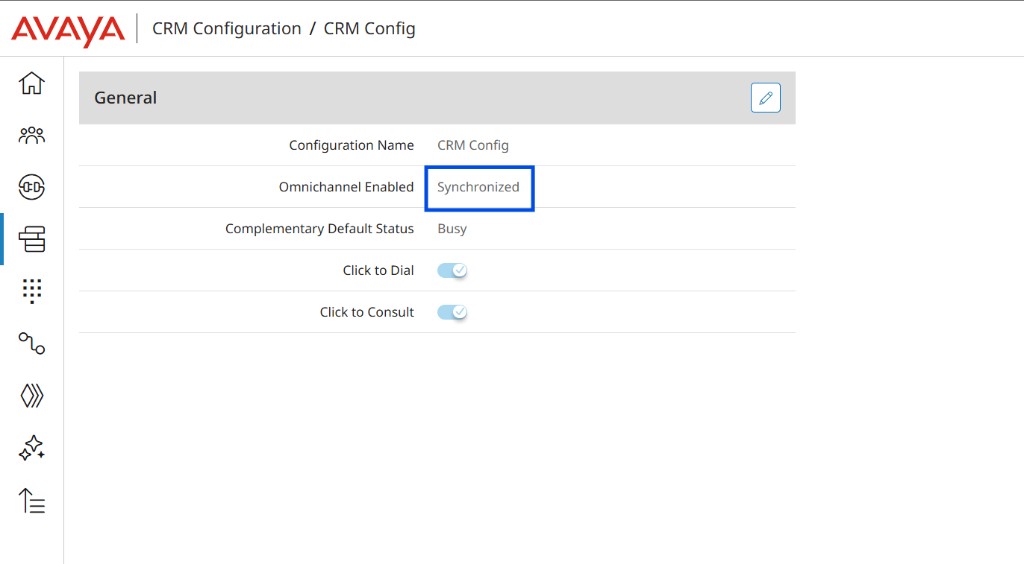
Then, on the user/agent page, set CRM Configuration to the configuration you enabled (for example, CRM Config).
Until both the configuration and the assignment are done, omnichannel will not run for that agent.
See Configuration for CRM Configuration settings.
2. Host CRM status names
On the host CRM side, ensure that CRM status names are aligned with the Infinity agent states so synchronization works correctly.
3. Synchronized mode
Omnichannel is set to Synchronized and host CRM status names are aligned with Infinity agent states.
- Change the agent status to Busy in Avaya Infinity Agent — the host CRM is automatically updated to Busy.
- Set the status to Available in the host CRM — it reflects back in Infinity.
- If the agent logs out of Infinity, the host CRM status is automatically set to Offline.
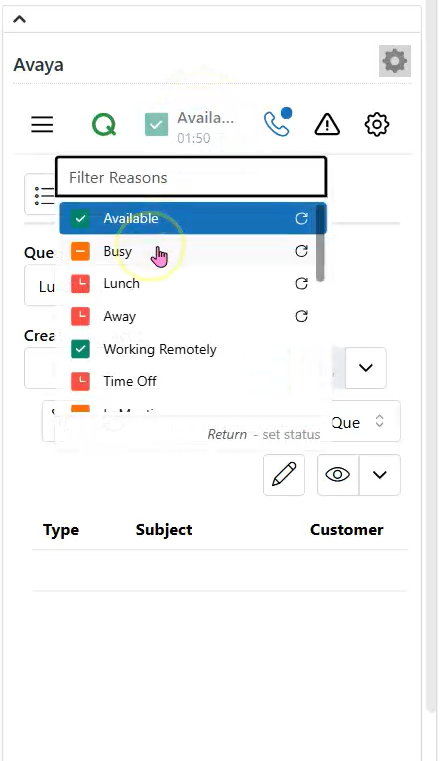
For the postMessage and Element API flow, see Omnichannel — Synchronized.
4. Active interaction
The agent has an active interaction, and omnichannel is enabled.
- During an active interaction, the host CRM status is set to Busy.
- The status remains Busy until the interaction is completed.
5. Complementary mode
Omnichannel is set to Complementary and a complementary default status is defined (for example, Busy).
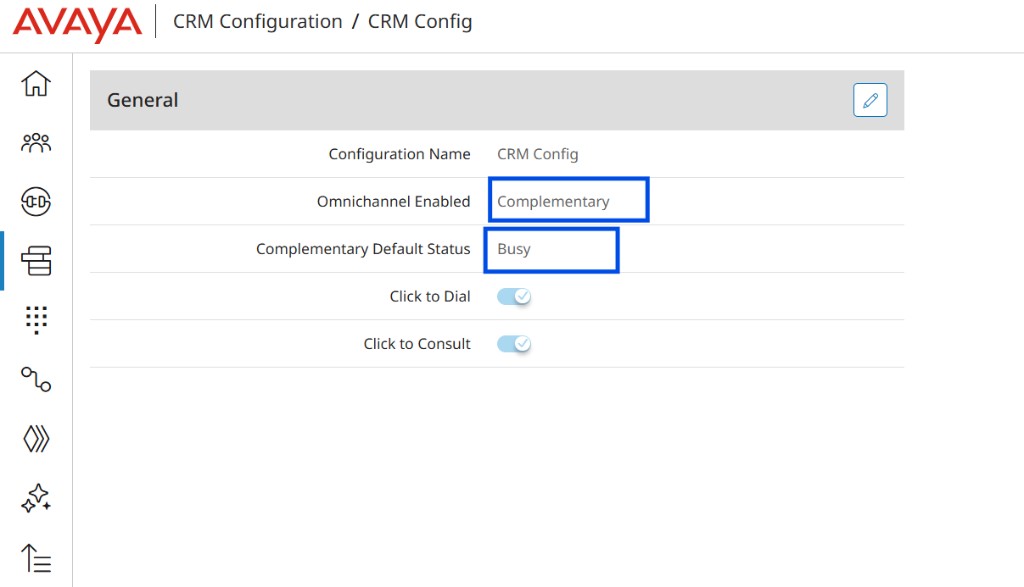
- When the agent is Available in Infinity, the host CRM is set to the complementary default status (Busy), so interactions are handled through a single channel.
- When the host CRM is set to Available, Infinity applies the complementary default status.
For the postMessage and Element API flow, see Omnichannel — Complementary.
CRM Directory
Walk through the CRM Directory Infinity Element: retrieve host CRM contacts, start an outbound call, or create a consult during an active interaction.
1. CRM Directory setup
Start with an Infinity Element for CRM Directory. Use the ready-made HTML resources/crmdirectoryh.html — upload or paste it into the Infinity Element configuration in Avaya Infinity Configuration. To customize the element, build from infinity-element-crm-directory/ in resources/zendesk_sample-app.zip.
Assign the element to the user so it appears in Avaya Infinity Agent, and optionally add it to the queue so it is also available during an active interaction.
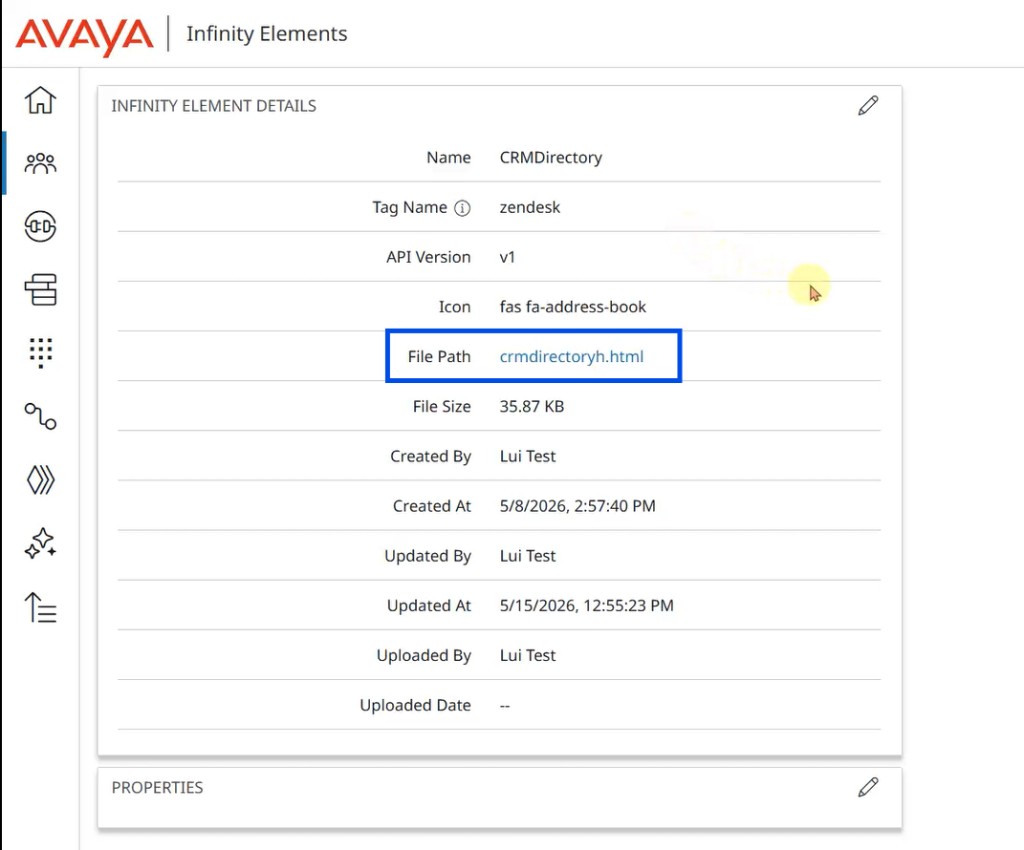
On the user/agent page, add that Infinity Element under Infinity Elements:
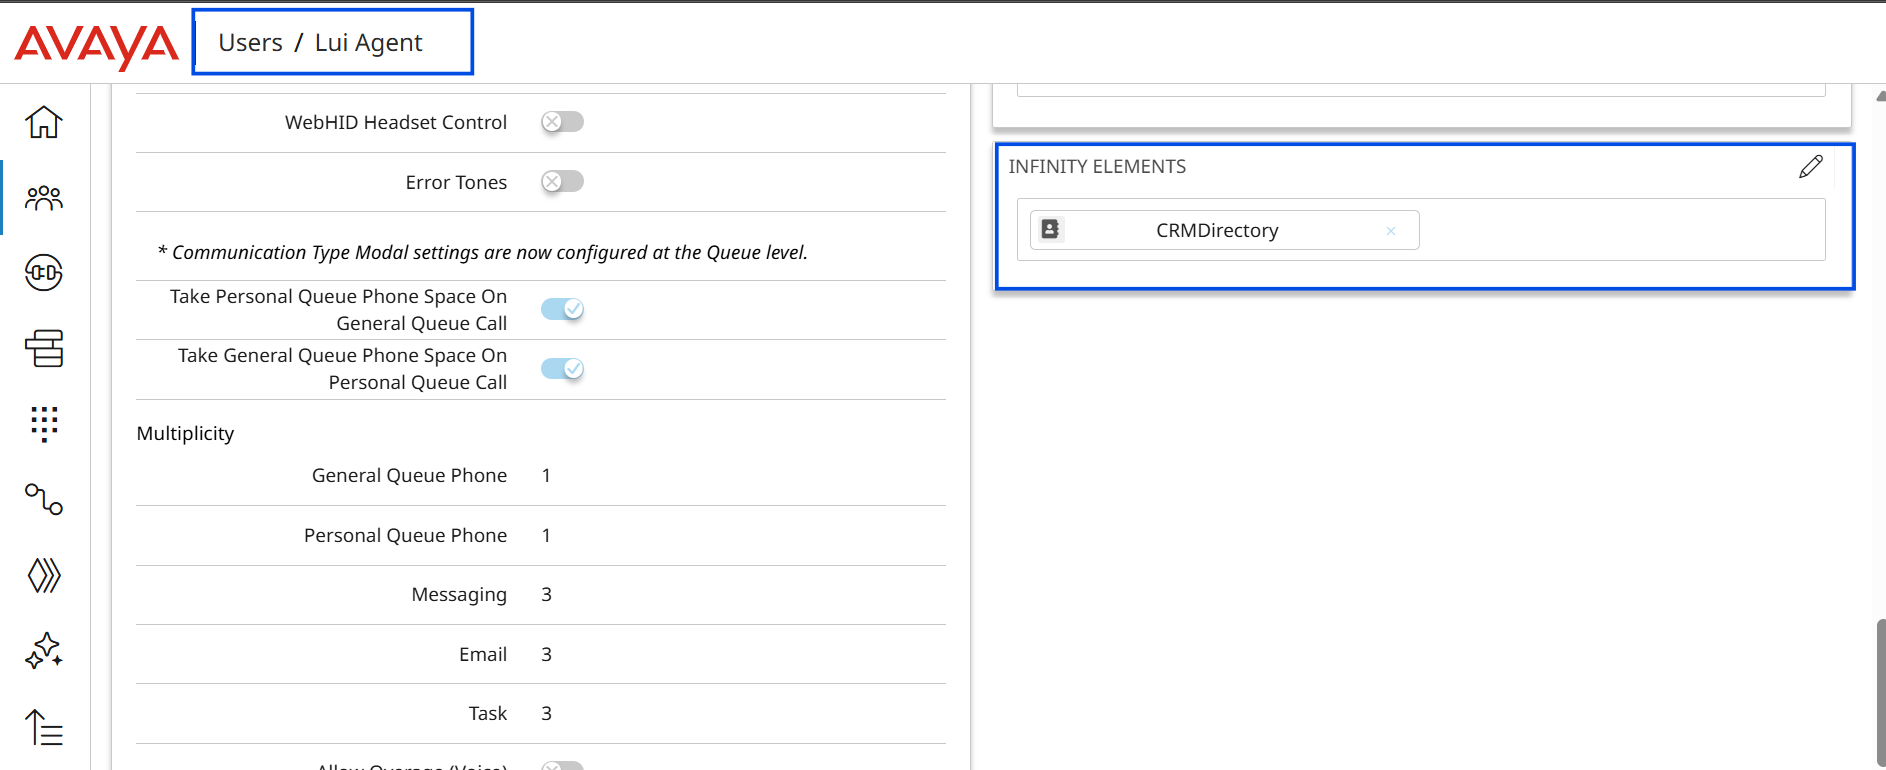
On the queue, add the same Infinity Element under Infinity Elements (and optionally set it as the default tab) so the directory is visible in an active interaction:
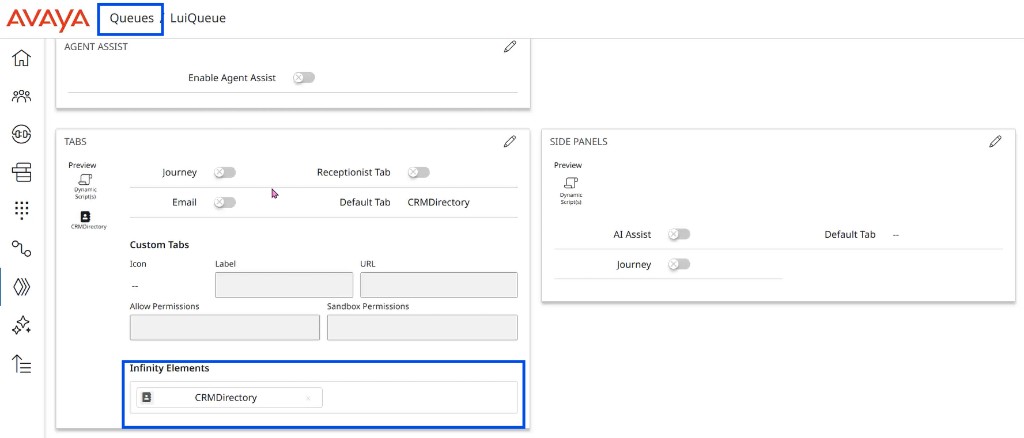
2. Opening the CRM Directory
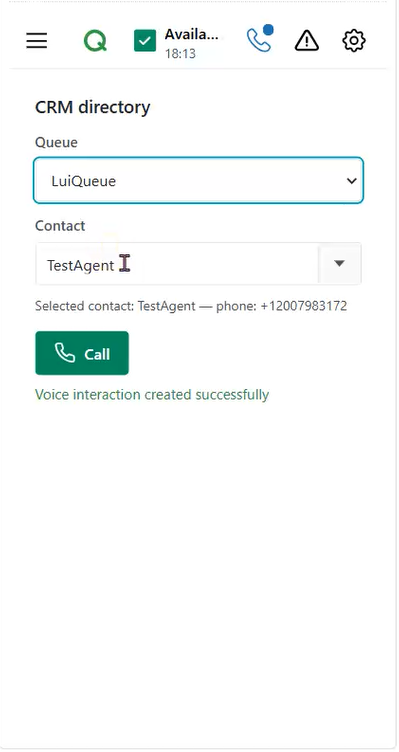
In Avaya Infinity Agent, open the CRM Directory. Select the queue to work with. The directory retrieves contacts from the host CRM and displays them in a list.
3. Creating an interaction
With no active interaction (or when outbound is available):
- Select a queue.
- Select a contact from the host CRM directory.
- Use Call to create an outbound interaction.
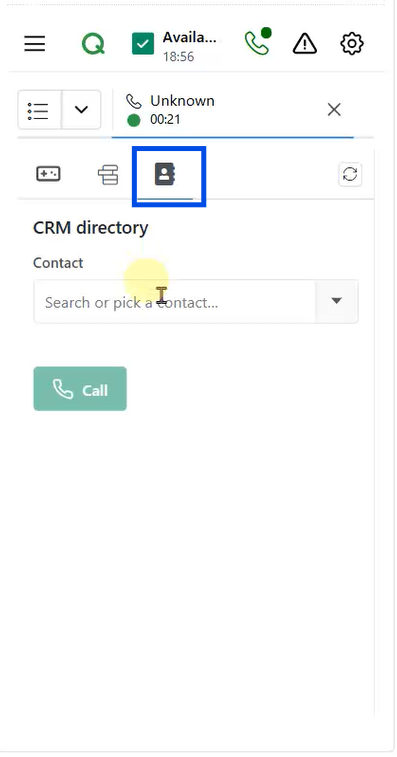
4. Using the CRM Directory during an active interaction
When there is an active interaction in Avaya Infinity Agent, the CRM Directory is available in the interaction workspace (for example as a tab).
- Open the CRM Directory from the interaction.
- Retrieve host CRM contacts.
- Select a contact to create a consult (not a new outbound call).
5. Consult options
After the consult starts, Avaya Infinity Agent presents:
- Complete Transfer
- Conference Call
- Cancel
For the postMessage and Element API flow, see CRM directory.
Resources
Updated about 2 months ago