Custom Messaging
Avaya Infinity™ Custom Messaging Overview
Avaya Infinity™ platform lets you integrate any third-party messaging provider. It provides a REST API to send an end user's message to the contact center. It automatically determines if the message needs to be part of a new or existing conversation session. For a new conversation session, the interaction will be routed according to the routing policies configured for the destination. Webhook callback events are also available to receive messages from the contact center to the end user. This mechanism of exchanging messages with any third-party provider is called 'Custom Messaging'.
To integrate a third-party messaging provider, you will need to write a small application called the connector. This application primarily needs to do two things:
- Listen to the third-party messaging provider for any new end user messages and forward it to Avaya Infinity™ platform by calling the 'Send Message' API endpoint.
- Listen to the Avaya Infinity™ webhook events for any messages from the contact center (for the end user) and forward it to the third-party messaging provider.
There are two types of channels supported for 'Custom Messaging':
textfor SMS channel. Refer to the SMS (Text) Developer Guide for more details.messagingfor integrating any third-party messaging provider. The rest of this guide covers this channel.
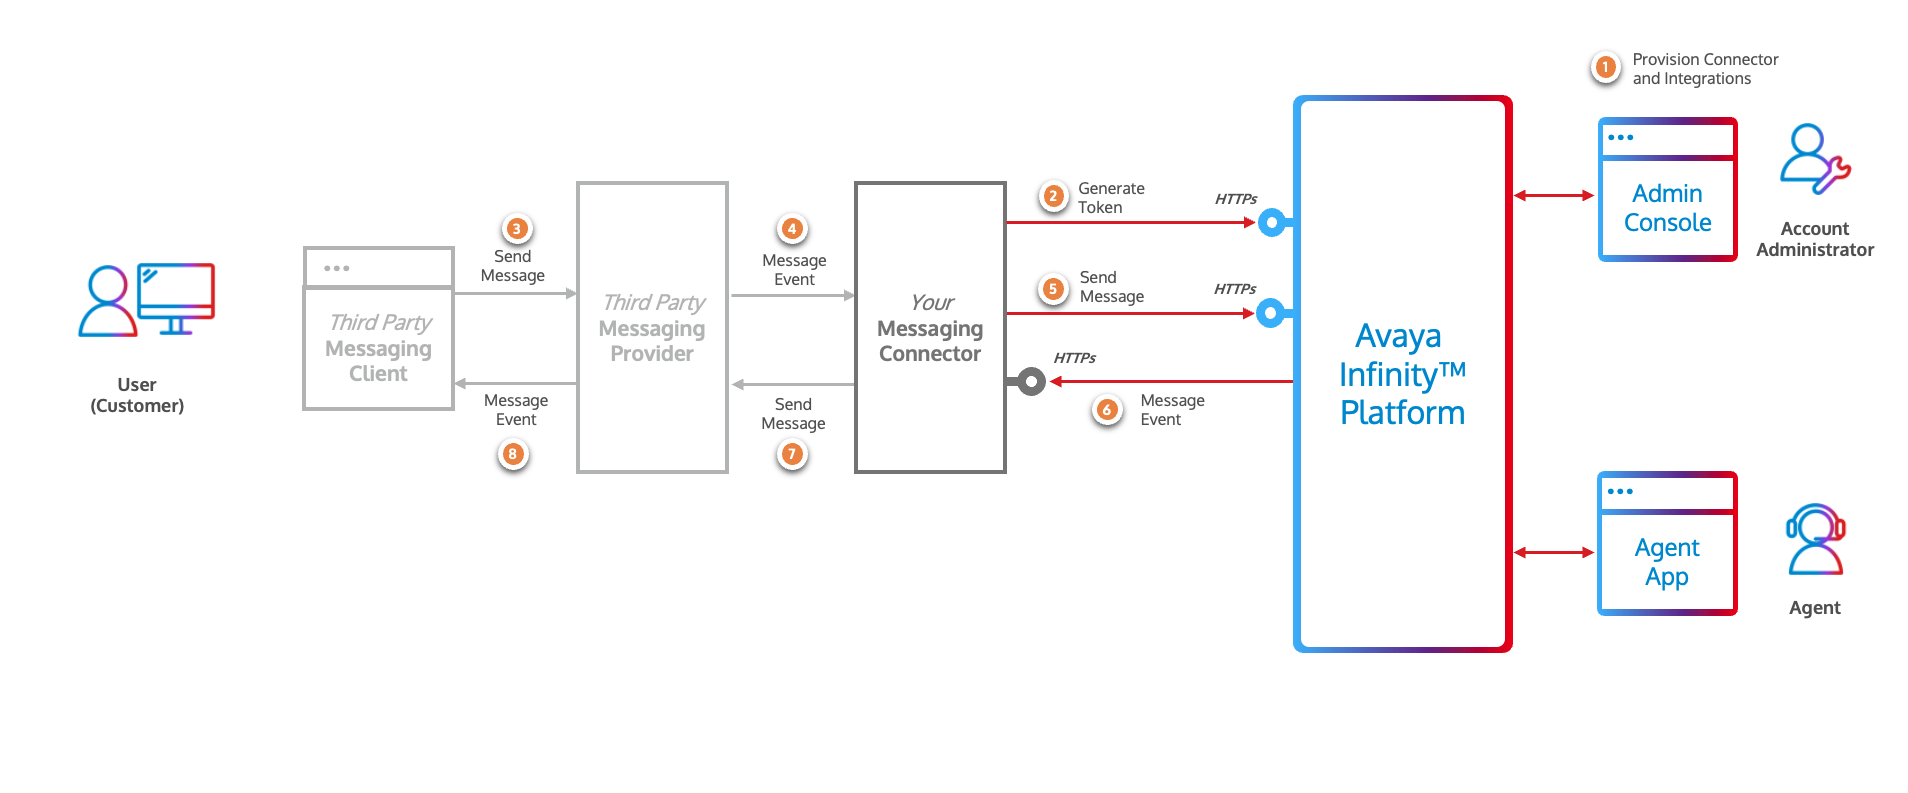
Here are the high-level steps to integrate with a third-party messaging provider:
-
Provision Connector and Integration in Admin Console
- a. Add a new Connector - Register your connector application by specifying the 'Webhook URL' to receive callback events from Avaya Infinity™ platform. Generate 'Client Credentials' for your connector for it to be able to send messages to Avaya Infinity™ platform.
- b. Configure an Integration - Create a new Integration, associate it with the Connector and define the routing configuration.
-
Generate Access Token
Using the 'Client Credentials' (generated in step 1.a), generate an access token by calling the 'Generate Access Token' API endpoint.
-
Send End User Message to Contact Center
When your connector receives a new end user message from your provider, call the 'Send Message' API endpoint to send the message to Avaya Infinity™ platform. Use the 'accessToken' (generated in the previous step), the 'connectorId' (generated in step 1.a) and the 'integrationId' (generated in step 1.b) as the destination along with other details to call the API.
-
Receive Messages from Contact Center and send to End User
When the contact center (workflows or agents) sends a message to the end user, Avaya Infinity™ platform will send a webhook callback event to the configured webhook URL of your connector application. On receiving the event, your connector application can forward the message to the third-party messaging provider.
In the following sections, we will go through the steps in detail.
Admin Configuration
To register your connector application with Avaya Infinity™ platform, you will need to add a new 'Connector' and create a Messaging Integration that will serve as an entry point for your business function.
Adding a Connector
An Admin can add a new Connector by following the steps below:
-
Login to the Admin Console, click the 'CX' menu and select 'Custom Connector' from the left sidebar. Alternatively, click the 'Custom Connector' link under the 'CX Management' card in the 'Home' page.
-
Under the 'Connectors' tab, click the
Create Connectorbutton. -
Provide the following details:
Connector Name- Provide a user-friendly name for the Connector.Connector Type- SelectMessagingfrom the dropdown.Webhook Callback URL- Provide theWebhook URLof your Connector application that will receive the callback events from Avaya Infinity™ platform.
-
Click the
Createbutton to add the new Connector. You will be redirected to the Connector details page. -
(Optional) Edit the
Connector Informationpanel to update the following details:Secret Key- Provide a webhook secret to secure the webhook.Subscribed Events- Select the events you want to subscribe to. Currently there are two options:Contact Center Messages- Callback events will be sent to theWebhook Callback URLfor any messages sent from the contact center (workflows or agents) to the end user.All Messages- Callback events will be sent to theWebhook Callback URLfor any messages sent from the contact center (workflows or agents) to the end user or from the end user to the contact center (workflows or agents).
-
Click the
Savebutton to update the Connector details. -
The Webhook URL can be tested by clicking the
Validate URLbutton. This will send an event with typehealth_checkto the Webhook Callback URL of your Connector application to verify if the URL is reachable. It expects a 200 OK response from your Connector application. Note that the event will be sent with the signature generated with theSecret Keyconfigured in the Connector details. -
Generate the Client Credentials by clicking the 'Generate' button on the 'Connector Credentials' panel. The
Client IDandClient Secretfields will appear. -
Copy the
Client IDby clicking the 'Copy' button next to theClient IDfield. -
Copy the
Client Secretby first clicking on the 'Get Secret' button and then clicking the 'Copy' button next to theClient Secretfield. -
Copy the
Connector IDfrom the 'Connector Information' panel.
Configuring the Messaging Integrations
An Admin must create a Messaging Integration that will represent as an entry point for your business function. The routing configurations that define how an incoming interaction will be treated is defined in the Messaging Integrations. Additionally, controls related to attachments are configured in the Messaging Integrations. Here are the steps to create a Messaging Integration:
-
Login to the Admin Console, click the
CXmenu and selectCustom Connectorfrom the left sidebar. Alternatively, click theCustom Connectorlink under theCX Managementcard in theHomepage. -
Under the
Messaging Integrationstab, click theCreate Integrationbutton. -
Provide the following details and click
Createbutton:Integration Name- Provide a user-friendly name for the Integration.Select Messaging Connector- Select the Connector created in the previous step from the dropdown
-
Edit the
Integration Detailspanel to update the following fields:Enable Integration- Toggle the switch to enable the Integration.Message Routing To- Select one of the following options:Workflow- The message will be routed to the workflow specified in the 'Message Route Data' field.Queue- The message will be routed to the queue specified in the 'Message Route Data' field.User- The message will be routed to the agent specified in the 'Message Route Data' field.
Message Route Data- Provide the data for the selected 'Message Route To' option.- For
Workflow, select the name of the workflow to route the message. Also provide the workflow version inMessage route Workflow Versionfield. - For
Queue, provide the name of the queue to route the message. - For
User, select the name of the agent to route the message.
- For
Can Send Attachments- Toggle the switch to allow incoming messages to have attachments.File Types Allowed- Select the attachment types allowed for the Integration. Applicable only ifCan Send Attachmentsis enabled.Max File Size (MB)- Provide the maximum attachment size in MB allowed for the Integration. Applicable only ifCan Send Attachmentsis enabled. Currently, the maximum allowed size is 10 MB.
-
Click the
Savebutton to update the Integration details.
[!IMPORTANT]
- These routing configurations are applicable only for end user messages coming into the contact center that will create a new conversation session.
API Authentication
To make API calls to Avaya Infinity™ for sending the end user message, an access token is required. The 'Generate Access Token' API endpoint needs to be invoked for this purpose.
Generate Access Token API
POST https://{{avaya-infinity-hostname}}/auth/realms/avaya/protocol/openid-connect/tokenParameters
| Field | Type | Required | Description |
|---|---|---|---|
| grant_type | string | Yes | Always set to client_credentials |
| client_id | string | Yes | The Client ID generated while configuring the connector |
| client_secret | string | Yes | The Client Secret generated while configuring the connector |
cURL Command
curl -X POST https://{{avaya-infinity-hostname}}/auth/realms/avaya/protocol/openid-connect/token \
-H "Content-Type: application/x-www-form-urlencoded" \
-d "grant_type=client_credentials&client_id={{YOUR_CONNECTOR_CLIENT_ID}}&client_secret={{YOUR_CONNECTOR_CLIENT_SECRET}}"
The API will return an access token in the response. The response also contains the expires_in field which indicates the number of seconds the access token is valid for. Usually it is valid for 900 seconds (15 minutes). The access token is a JSON Web Token (JWT) and can be decoded to get the actual expiry time (in seconds since epoch) from the exp claim.
Your connector application must cache the access token and use it to invoke the 'Send Message' API endpoint until it expires.
In production environments, to ensure smooth operation without delays in message delivery, the connector must generate a new access token before it expires.
Sending a Message to Avaya Infinity™
When your connector receives a new message from your third-party messaging provider, it will need to call the 'Send Message' API endpoint to send the message to Avaya Infinity™ platform. The destination in your message should be the id of the Messaging Integration configured and associated with the Connector in the Admin Console (as described in the Admin Configuration section).
Here is an example cURL command to send a message:
curl -X POST https://{{avaya-infinity-hostname}}/api/digital/messaging/v1/messages \
-H "Authorization: Bearer {{YOUR_ACCESS_TOKEN}}" \
-H "Content-Type: application/json" \
-d '{
  "connectorId": "{{YOUR_CONNECTOR_ID}}",
  "channel": "messaging",
  "headers": {
    "from": "{{END_USER_IDENTIFIER}}",
    "destination": "{{YOUR_INTEGRATION_ID}}",
    "channelName": "{{CHANNEL_USED_BY_END_USER}}",
    "channelAddress": "{{YOUR_CHANNEL_ADDRESS_USED_BY_END_USER}}",
  },
  "body": {
    "text": "Hi. I need some help on my insurance"
  }
}'
Expected response format:
{
  "messageId": "{{MESSAGE_ID}}",
  "conversationSessionId": "{{CONVERSATION_SESSION_ID}}",
  "connectorId": "{{YOUR_CONNECTOR_ID}}",
  "channel": "messaging",
  "headers": {
    "from": "{{END_USER_IDENTIFIER}}",
    "destination": "{{YOUR_INTEGRATION_ID}}",
    "channelName": "{{CHANNEL_USED_BY_END_USER}}",
    "channelAddress": "{{YOUR_CHANNEL_ADDRESS_USED_BY_END_USER}}",
  },
  "body": {
    "text": "Hi. I need some help on my insurance"
  }
}
Routing the Message
When Avaya Infinity™ platform receives the message, it will determine if the message needs to be part of a new or existing conversation session based on fields like connectorId, channel, headers.from, headers.destination, headers.channelName and headers.channelAddress. If a new conversation session is created, the interaction will be routed according to the routing policies configured for the headers.destination field.
Correlating the Messages
The 'Send Message' API endpoint returns the messageId and conversationSessionId fields in the response.
These fields also appear in message events when end user messages are added to a conversation session provided the connector is configured to subscribe to the All Messages event. You can use these fields to track requests and correlate conversation sessions.
Passing Context Information to the Workflow
The optional field contextParameters can be used to pass additional data to the workflow. For example, in the below example, the value of key1 can be accessed in a workflow as source.contextParameters.key1.
curl -X POST https://{{avaya-infinity-hostname}}/api/digital/messaging/v1/messages \
-H "Authorization: Bearer {{YOUR_ACCESS_TOKEN}}" \
-H "Content-Type: application/json" \
-d '{
  "connectorId": "{{YOUR_CONNECTOR_ID}}",
  "channel": "messaging",
  "headers": {
    "from": "{{END_USER_IDENTIFIER}}",
    "destination": "{{YOUR_INTEGRATION_ID}}",
    "channelName": "{{CHANNEL_USED_BY_END_USER}}",
    "channelAddress": "{{YOUR_CHANNEL_ADDRESS_USED_BY_END_USER}}",
  },
  "body": {
    "text": "Hi. I need some help on my insurance"
  },
  "contextParameters": {
    "key1": "value1"
  }
}'
Sending Messages with Attachments
To send messages with attachments, you need to perform the following steps:
-
Generate a signed URL for uploading the attachment by calling the 'Generate Signed Upload URI' API endpoint. The response will contain the
uploadSignedUrifield which is the signed URL for uploading the attachment. -
Use the
uploadSignedUrito upload the attachment.- Use the HTTP POST method
- Set the request body as form-data with
fileas the 'key' and the attachment file as the 'value'.
The response will contain the
idfield which is the ID of the attachment. -
Send the message with the attachment by calling the 'Send Message' API endpoint and passing the
idreceived in the above step in theattachmentIdsfield. Ensure that thebody.typefield is set tofile, else the attachments may get ignored.
You can send multiple attachments in a single message by repeating steps 1 and 2 and collating the id values for each attachment, and passing them in the attachmentIds field of the 'Send Message' API endpoint.
Here is an example of sending a message with a single attachment:
-
Generate an upload signed URI
Request:
curl -X POST https://{{avaya-infinity-hostname}}/api/digital/messaging/v1/messages \
-H "Authorization: Bearer {{YOUR_ACCESS_TOKEN}}" \
-H "Content-Type: application/json" \
-d '{
  "integrationId": "{{YOUR_INTEGRATION_ID}}",
  "filename": "my-image-file.png",
  "mimetype": "image/png",
  "size": 385681
}'
Response:
{ "uploadSignedUri": "/api/digital/messaging/v1/storage/upload-sessions/b8579957-1717-480e-8919-3111f6f8e28c?hmac=0eee27a2b6454823cdd7fe6123cac27bfc9abc4f4f3833205a34e4fac14f09eb&expiresAt=1765913116081" } -
Upload the attachment to the signed URL
Request:
curl -X POST https://{{avaya-infinity-hostname}}/api/digital/messaging/v1/storage/upload-sessions/b8579957-1717-480e-8919-3111f6f8e28c?hmac=0eee27a2b6454823cdd7fe6123cac27bfc9abc4f4f3833205a34e4fac14f09eb&expiresAt=1765913116081 \
-H "Authorization: Bearer {{YOUR_ACCESS_TOKEN}}" \
-F 'file=@"/Documents/my-image-file.png"'
Response:
{ "id": "096d011216bdf59d4c466bd3ea", "filename": "my-image-file.png", "mimetype": "image/png", "size": 385681 } -
Send the message with the attachment ids generated
Request:
curl -X POST https://{{avaya-infinity-hostname}}/api/digital/messaging/v1/messages \
-H "Authorization: Bearer {{YOUR_ACCESS_TOKEN}}" \
-H "Content-Type: application/json" \
-d '{
  "connectorId": "{{YOUR_CONNECTOR_ID}}",
  "channel": "messaging",
  "headers": {
    "from": "{{END_USER_IDENTIFIER}}",
    "destination": "{{YOUR_INTEGRATION_ID}}",
    "channelName": "{{CHANNEL_USED_BY_END_USER}}",
    "channelAddress": "{{YOUR_CHANNEL_ADDRESS_USED_BY_END_USER}}",
  },
  "body": {
    "type": "file",
    "text": "Here is the screenshot with the details"
  },
  "attachmentIds": [
    "096d011216bdf59d4c466bd3ea"
  ]
}'
Sending 'Reply' Messages
The workflow of Avaya Infinity™ platform is capable of sending messages to the end user with action buttons. When the end user selects an action button, you need to send the 'reply' message to the end user by calling the 'Send Message' API endpoint and passing the body.type field as reply and the body.selectedAction.payload field as the payload value of the action button. This payload value will trigger the workflow to execute the appropriate path. Hence it is important to send the exact same payload value as the payload value of the action button that was sent in the original message sent to the end user.
The example of a message event of a message sent by workflow containing the action buttons is mentioned in this section.
Here is an example of the Send Message API request when end user selects an action button:
curl -X POST https://{{avaya-infinity-hostname}}/api/digital/messaging/v1/messages \
-H "Authorization: Bearer {{YOUR_ACCESS_TOKEN}}" \
-H "Content-Type: application/json" \
-d '{
  "connectorId": "{{YOUR_CONNECTOR_ID}}",
  "channel": "messaging",
  "headers": {
    "from": "{{END_USER_IDENTIFIER}}",
    "destination": "{{YOUR_INTEGRATION_ID}}",
    "channelName": "{{CHANNEL_USED_BY_END_USER}}",
    "channelAddress": "{{YOUR_CHANNEL_ADDRESS_USED_BY_END_USER}}",
  },
  "body": {
    "type": "reply",
    "selectedAction": {
      "payload": "BOOK_APPOINTMENT_SERVICE"
    }
  }
}'
Context Messages
You may design your message application to show message(s) to the end user at the start of the conversation. For example, messages to welcome the end user, provide options to pick the topic of the conversation, any notices, or simply reminders to the end user to send a message to start the conversation. When the end user responds by sending the first message, you can send the messages displayed to the end user along with the end user message. When an agent receives an interaction, these messages will be displayed to the agent (as AI Assistant messages), providing a better context.
curl -X POST https://{{avaya-infinity-hostname}}/api/digital/messaging/v1/messages \
-H "Authorization: Bearer {{YOUR_ACCESS_TOKEN}}" \
-H "Content-Type: application/json" \
-d '{
  "connectorId": "{{YOUR_CONNECTOR_ID}}",
  "channel": "messaging",
  "headers": {
    "from": "{{END_USER_IDENTIFIER}}",
    "destination": "{{YOUR_INTEGRATION_ID}}",
    "channelName": "{{CHANNEL_USED_BY_END_USER}}",
    "channelAddress": "{{YOUR_CHANNEL_ADDRESS_USED_BY_END_USER}}",
  },
  "body": {
    "text": "Hi. I need some help on my insurance"
  },
  "contextMessages": [
    {
        "text": "Welcome to the my-bank. How can I help you?",
        "timestamp": "2025-11-04T12:00:00Z"
    },
    {
        "text": "We did not receive any input. Please send a message to start the conversation.",
        "timestamp": "2025-11-04T12:05:00Z"
    }
  ]
}'
The contextMessages are recorded only for the first message sent by the end user that will start the conversation session within Avaya Infinity™ platform. For subsequent messages, the contextMessages will be ignored.
Receiving a Message from Avaya Infinity™
Avaya Infinity™ platform will send a webhook callback event to the Webhook Callback URL of your connector application when the message is added in a conversation session in the Avaya Infinity™ platform provided the connector is configured to subscribe to the All Messages event.
Here is an example of an event containing a message from the contact center to the end user:
{
  "eventType": "messages",
  "eventId": "5aa44fb2-d4d8-4f18-9912-c68e0f2d05de",
  "eventTimestamp": "2025-12-08T04:15:28.718940243Z",
  "messageId": "049d0112089995e559959b2e71",
  "accountId": "001d0111047482414f210866d1",
  "conversationSessionId": "016d01120835395ba7ad838d91",
  "connectorId": "2ff854a9-f3ee-433e-a90f-0fe7503182b9",
  "channel": "messaging",
  "headers": {
    "from": "153bee29-295c-4b3b-8ce3-2eb4a904e800",
    "to": [
      "johndoe123"
    ],
    "channelAddress": "https://the-platform.example.com/my-page-id",
    "channelName": "the-platform"
  },
  "body": {
    "text": "Hi. My name is Jane Smith. How may I help you today?",
    "type": "text"
  },
  "sender": {
    "type": "agent",
    "name": "Jane Smith"
  }
}
Detailed descriptions of the fields in the webhook callback event are provided in the Webhook Event Payload Definitions section.
Webhook Callback Requests
To receive events from Avaya Infinity™ platform, your connector application must do the following:
- Expose a webhook endpoint that accepts POST requests with event payloads defined in the below section.
- This endpoint must be registered as the
Webhook Callback URLin the Connector details in the Avaya Infinity™ Admin Console. - The endpoint must be accessible from the internet. Alternatively, services like ngrok can be used to test the webhook endpoint locally.
- After processing the event, the connector application must respond with a 200 OK response to the Avaya Infinity™.
If your connector application fails to process the event and returns an error response, based on the error response code, Avaya Infinity™ platform will retry sending the request with exponential backoff. After a certain number of retries, the event will be dropped and no further retries will be attempted.
Here is the list of retriable error response codes:
- 408 Request Timeout
- 429 Too Many Requests
- 5xx Server Errors
Webhook Event Payload Definitions
Health Check Event
Avaya Infinity™ platform will send a health check event to the configured Webhook Callback URL of your connector to verify if the webhook endpoint is reachable. If the webhook endpoint is not reachable or the connector application returns an error response, Avaya Infinity™ platform will mark the webhook endpoint as disabled. The admin must validate the webhook URL again after fixing the issue to enable the webhook endpoint again. Hence it is mandatory for the connector application to handle the health check event.
Health Check Event: Payload Definition
| Field | Type | Required | Description |
|---|---|---|---|
| eventType | string | Yes | The event type. Must be health_check |
| eventId | string | Yes | The unique identifier for the event |
| eventTimestamp | string | Yes | The timestamp of the event in ISO 8601 Format: YYYY-MM-DDTHH:MM:SS.sssZ |
| accountId | string | Yes | The account Id. |
| connectorId | string | Yes | The connector Id. |
Health Check Event: Payload Examples
{
  "eventType": "health_check",
  "eventId": "7ebffbb2-3ec0-4f03-a17e-46c9c2608338",
  "eventTimestamp": "2025-09-14T16:49:22.219Z",
  "accountId": "001d0106666c6888cc999c111c",
  "connectorId": "a2a22a22-b66b-4444-a9a9-dd111d111d11"
}
Messages Event
Avaya Infinity™ platform will send a webhook callback event to the Webhook Callback URL of your connector application when the message is added in a conversation session. The message can either be a Contact Center message or an end user message.
Messages Event: Payload Definition
| Field | Type | Required | Description |
|---|---|---|---|
| eventType | string | Yes | The event type. Must be messages |
| eventId | string | Yes | The unique identifier for the event |
| eventTimestamp | string | Yes | The timestamp of the event in ISO 8601 Format: YYYY-MM-DDTHH:MM:SS.sssZ |
| messageId | string | Yes | The unique identifier for the message |
| accountId | string | Yes | The account Id. |
| conversationSessionId | string | Yes | The conversation session Id. |
| connectorId | string | Yes | The connector Id. |
| channel | string | Yes | The channel of the message. Must be messaging |
| headers | Headers Object | Yes | The headers of the message |
| body | Body Object | Yes | The body of the message |
| sender | Sender Object | Yes | The sender of the message |
| attachments | array of Attachment Object | No | The attachments of the message |
Headers Object
| Field | Type | Required | Description |
|---|---|---|---|
| from | string | Yes | The message sender identifier. If the sender.type is agent or bot, this will be the integrationId. If the sender.type is customer, this will be the identifier of the end user. |
| to | array of strings | Yes | The message recipient identifier. If the sender.type is agent or bot, this will be the end user identifier. If the sender.type is customer, this will be the integrationId. |
| channelName | string | Yes | The name of the application or messaging platform using which the end customer started the conversation |
| channelAddress | string | Yes | The address of the channel, for example, the page id or URL of the application using which the end customer started the conversation |
Body Object
| Field | Type | Required | Description |
|---|---|---|---|
| text | string | Yes | The text of the message |
| type | string | Yes | The type of the body. Must be text or file or reply. reply is only valid when sender.type is customer |
| actions | array of Action Object | No | The action buttons sent in the message. This field is only valid when sender.type is bot |
| selectionAction | Selection Action Object | No | The action button selected by the end user. This field is only valid when body.type is reply and sender.type is customer |
Sender Object
| Field | Type | Required | Description |
|---|---|---|---|
| type | string | Yes | The type of the sender. Must be agent or bot or customer |
| name | string | No | The name of the sender |
Attachment Object
| Field | Type | Required | Description |
|---|---|---|---|
| storageId | string | Yes | The identifier for the attachment |
| name | string | Yes | The file name of the attachment |
| contentType | string | Yes | The MIME type of the attachment |
| size | number | Yes | The size of the attachment in bytes |
| downloadSignedUri | string | Yes | The signed download URI of the attachment |
Action Object
| Field | Type | Required | Description |
|---|---|---|---|
| text | string | Yes | The text of the action button |
| payload | string | Yes | The intent of the action button |
Selection Action Object
| Field | Type | Required | Description |
|---|---|---|---|
| payload | string | Yes | The payload of the action button |
Event Payload Examples
Message Event: Simple Workflow Message
{
  "eventType": "messages",
  "eventId": "5aa44fb2-d4d8-4f18-9912-c68e0f2d05de",
  "eventTimestamp": "2025-12-08T04:15:28.718940243Z",
  "messageId": "049d0112089995e559959b2e71",
  "accountId": "001d0111047482414f210866d1",
  "conversationSessionId": "016d01120835395ba7ad838d91",
  "connectorId": "2ff854a1-f3ee-433e-a90f-0fe7503182b9",
  "channel": "messaging",
  "headers": {
    "from": "153bee29-295c-4b3b-8ce3-2eb4a904e800",
    "to": [
      "johndoe123"
    ],
    "channelName": "the-platform",
    "channelAddress": "https://the-platform.example.com/my-page-id"
  },
  "body": {
    "text": "How may I help you?",
    "type": "text"
  },
  "sender": {
    "type": "bot"
  }
}
Message Event: Workflow Message with Action Buttons
{
  "eventType": "messages",
  "eventId": "6b6769ea-5ddb-492c-ad96-b9bf429d757e",
  "eventTimestamp": "2025-12-08T03:59:09.719189576Z",
  "messageId": "049d01120876a849b3e4006d2c",
  "accountId": "001d0111047482414f210866d1",
  "conversationSessionId": "016d01120835395ba7ad838d91",
  "connectorId": "2ff854a1-f3ee-433e-a90f-0fe7503182b9",
  "channel": "messaging",
  "headers": {
    "from": "153bee29-295c-4b3b-8ce3-2eb4a904e800",
    "to": [
      "johndoe123"
    ],
    "channelName": "the-platform",
    "channelAddress": "https://the-platform.example.com/my-page-id"
  },
  "body": {
    "text": "Please select a topic",
    "type": "text",
    "actions": [
      {
        "text": "Cards",
        "payload": "CARDS"
      },
      {
        "text": "Loans",
        "payload": "LOANS"
      },
      {
        "text": "Savings",
        "payload": "BANKING_SAVINGS"
      }
    ]
  },
  "sender": {
    "type": "bot"
  }
}
Message Event: Simple Agent Message
{
  "eventType": "messages",
  "eventId": "5aa44fb2-d4d8-4f18-9912-c68e0f2d05de",
  "eventTimestamp": "2025-12-08T04:15:28.718940243Z",
  "messageId": "049d0112089995e559959b2e71",
  "accountId": "001d0111047482414f210866d1",
  "conversationSessionId": "016d01120835395ba7ad838d91",
  "connectorId": "2ff854a1-f3ee-433e-a90f-0fe7503182b9",
  "channel": "messaging",
  "headers": {
    "from": "153bee29-295c-4b3b-8ce3-2eb4a904e800",
    "to": [
      "johndoe123"
    ],
    "channelName": "the-platform",
    "channelAddress": "https://the-platform.example.com/my-page-id"
  },
  "body": {
    "text": "Hi. My name is Jane Smith. How may I help you today?",
    "type": "text"
  },
  "sender": {
    "type": "agent",
    "name": "Jane Smith"
  }
}
Message Event: Agent Message with Attachments
{
  "eventType": "messages",
  "eventId": "59e9de8f-6b99-4a57-888f-d56cfef80f40",
  "eventTimestamp": "2025-12-17T05:51:40.210991245Z",
  "messageId": "049d011217736b01759c3357dc",
  "accountId": "001d0111047482414f210866d1",
  "conversationSessionId": "016d0112179f2313e6c769ea54",
  "connectorId": "2ff854a1-f3ee-433e-a90f-0fe7503182b9",
  "channel": "messaging",
  "headers": {
    "from": "153bee29-295c-4b3b-8ce3-2eb4a904e800",
    "to": [
      "johndoe123"
    ],
    "channelName": "the-platform",
    "channelAddress": "https://the-platform.example.com/my-page-id"
  },
  "body": {
    "text": "",
    "type": "file"
  },
  "sender": {
    "type": "agent",
    "name": "Saumabha Pal"
  },
  "attachments": [
    {
      "storageId": "096d01121751f57fb74fb00dd3",
      "name": "ayava-cc.pdf",
      "contentType": "application/pdf",
      "size": 725298,
      "downloadSignedUri": "/api/digital/messaging/v1/storage/096d01121751f57fb74fb00dd3?hmac=85394483cfc58cbc448e77652fa58b4446fac4c6635c1633f57c71ed4aa98f51&expiresAt=1765965100278"
    }
  ]
}
Message Event: Simple End User Message
{
  "eventType": "messages",
  "eventId": "5deee743-ec6d-4c82-a237-44b4293ca4bc",
  "eventTimestamp": "2025-12-05T15:01:51.488011498Z",
  "messageId": "049d0112055cafff4e874d8934",
  "accountId": "001d0111047482414f210866d1",
  "conversationSessionId": "016d01120561ac22aed0110504",
  "connectorId": "2ff854a1-f3ee-433e-a90f-0fe7503182b9",
  "channel": "messaging",
  "headers": {
    "from": "johndoe123",
    "to": [
      "153bee29-295c-4b3b-8ce3-2eb4a904e800"
    ],
    "channelName": "the-platform",
    "channelAddress": "https://the-platform.example.com/my-page-id"
  },
  "body": {
    "text": "Hi. I need some help on my insurance!",
    "type": "text"
  },
  "sender": {
    "type": "customer"
  }
}
Message Event: End User Message with Attachments
{
  "eventType": "messages",
  "eventId": "b5ad7cb0-6c77-4f88-81eb-f3d01a7b4f21",
  "eventTimestamp": "2025-12-17T05:56:25.335577394Z",
  "messageId": "049d011217057616d1e920866a",
  "accountId": "001d0111047482414f210866d1",
  "conversationSessionId": "016d0112179f2313e6c769ea54",
  "connectorId": "2ff854a1-f3ee-433e-a90f-0fe7503182b9",
  "channel": "messaging",
  "headers": {
    "from": "johndoe123",
    "to": [
      "153bee29-295c-4b3b-8ce3-2eb4a904e800"
    ],
    "channelName": "the-platform",
    "channelAddress": "https://the-platform.example.com/my-page-id"
  },
  "body": {
    "text": "Here is the screenshot",
    "type": "file"
  },
  "sender": {
    "type": "customer"
  },
  "attachments": [
    {
      "storageId": "096d011217fa4a8a27c5553285",
      "name": "0001_gmail.png",
      "contentType": "image/png",
      "size": 385681,
      "downloadSignedUri": "/api/digital/messaging/v1/storage/096d011217fa4a8a27c5553285?hmac=1c16e7d9de36bd7e6156027375eefee4308c7988e0b814dc4063afa938a2f891&expiresAt=1765965385355"
    }
  ]
}
Message Event: End User Message with Reply
{
  "eventType": "messages",
  "eventId": "c8f1ad78-7ff1-4d37-a892-d2ec0dd5d8bf",
  "eventTimestamp": "2025-12-05T15:37:31.862072874Z",
  "messageId": "049d011205f4cbd1ab04a96718",
  "accountId": "001d0111047482414f210866d1",
  "conversationSessionId": "016d011205fc43bc7d79fbc2b9",
  "connectorId": "2ff854a1-f3ee-433e-a90f-0fe7503182b9",
  "channel": "messaging",
  "headers": {
    "from": "johndoe123",
    "to": [
      "153bee29-295c-4b3b-8ce3-2eb4a904e800"
    ],
    "channelName": "the-platform",
    "channelAddress": "https://the-platform.example.com/my-page-id"
  },
  "body": {
    "text": "BOOK_APPOINTMENT_SERVICE",
    "type": "text"
  },
  "sender": {
    "type": "customer"
  }
}
Downloading Message Attachments
When you receive a message event with attachments, you can download the attachments using the downloadSignedUri field in the attachment object.
For example, if we receive the Agent Message with Attachments event, the cURL request to download the attachment would be:
curl -X GET https://{{avaya-infinity-hostname}}/api/digital/messaging/v1/storage/096d01121751f57fb74fb00dd3?hmac=85394483cfc58cbc448e77652fa58b4446fac4c6635c1633f57c71ed4aa98f51&expiresAt=1765965100278 \
-H "Authorization: Bearer {{YOUR_ACCESS_TOKEN}}"
The downloadSignedUri expires after the time specified as EPOCH timestamp in the expiresAt field. In case you want to download the attachment after the expiry, you can generate a new signed URI by calling the 'Generate Signed Download URI' API endpoint and passing the attachmentId.
curl -X POST https://{{avaya-infinity-hostname}}/api/digital/messaging/v1/attachments/signed-download-uri \
-H "Authorization: Bearer {{YOUR_ACCESS_TOKEN}}" \
-d '{
  "integrationId": "{{YOUR_INTEGRATION_ID}}",
  "attachmentId": "096d01121751f57fb74fb00dd3"
}'
The response will contain the downloadSignedUri field using which you can download the attachment.
Securing Webhook
The authenticity of the webhook callback event can be verified by setting the webhook Webhook Secret Key field in the Connector Information panel in the Connector details page in the Admin Console. If the Secret Key is set, Avaya Infinity™ platform will use it to create a signature of the event payload and include the signature in the x-avaya-event-signature header of the callback request.
The signature is generated using the following steps:
- Create a HMAC-SHA256 hash of the event payload using the webhook
Secret Keyas the key. - Base64 encode the hash.
- Prefix the hash with
sha256=.
On receiving the callback request, your connector application can verify the signature of the event by regenerating the signature using the same steps and compare it with the x-avaya-event-signature header. If the signatures do not match, the callback request should be rejected.
Here is an example of how your connector application can generate the signature and verify the event payload:
// Generate the signature
const hmac = crypto.createHmac('sha256', webhookSecret);
hmac.update(JSON.stringify(req.body), 'utf8');
const generatedHmac = "sha256=" + hmac.digest('base64');

// compare the generatedHmac with the x-avaya-event-signature header
if (generatedHmac !== req.headers['x-avaya-event-signature']) {
    return res.status(401).send('Unauthorized');
}
Disconnecting the Conversation Session
When the end user ends the conversation, you can disconnect the conversation session by calling the 'End Conversation Session' API endpoint.
curl -X POST https://{{avaya-infinity-hostname}}/api/digital/messaging/v1/conversation-sessions/{{conversationSessionId}}:end \
-H "Authorization: Bearer {{YOUR_ACCESS_TOKEN}}" \
-d ''
Updated 6 months ago