(OLD)-25.3 SMS (Text)
Avaya Infinity™ Custom Messaging Overview
Avaya Infinity platform lets you integrate any third-party messaging provider. It provides a REST API to send an end user's message to the contact center. It automatically determines if the message needs to be part of a new or existing conversation session. For a new conversation session, the interaction will be routed according to the routing policies configured for the destination. Webhook callback events are also available to receive messages from the contact center to the end user. This mechanism of exchanging messages with any third-party provider is called 'Custom Messaging'.
To integrate a third-party messaging provider, you will need to write a small application called the connector. This application primarily needs to do two things:
- Listen to the third-party messaging provider for any new end user messages and forward it to Avaya Infinity™ platform by calling the 'Send Message' API endpoint.
- Listen to the Avaya Infinity™ webhook events for any messages from the contact center (for the end user) and forward it to the third-party messaging provider.
Currently, only text channel i.e. SMS is supported for 'Custom Messaging'.
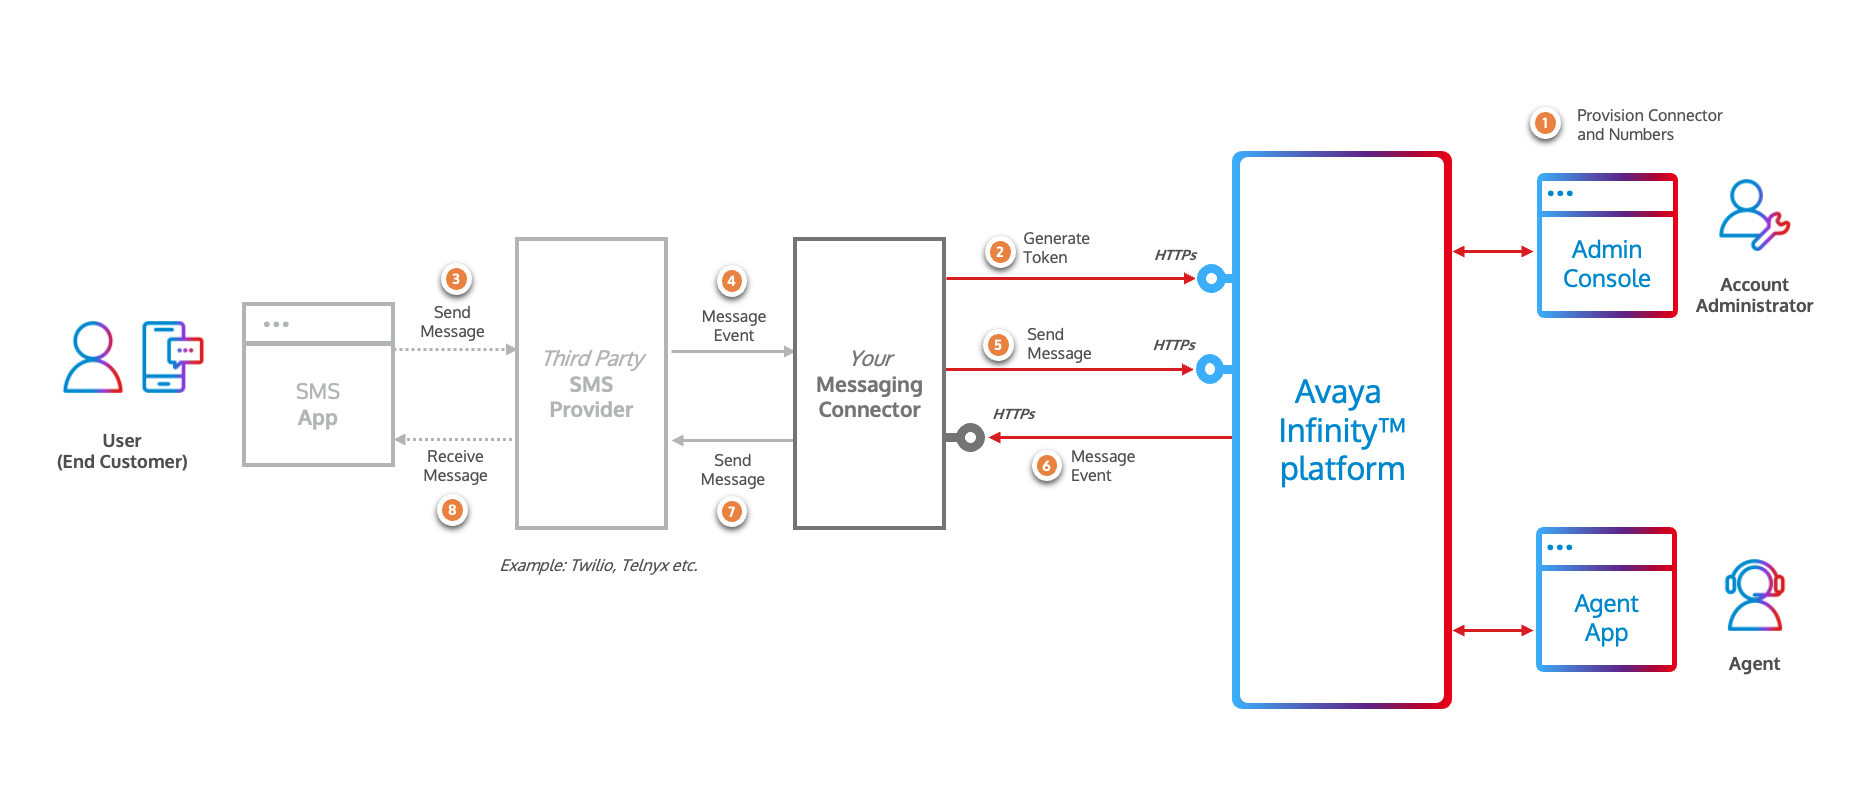
Here are the high level steps to integrate with a third-party SMS provider using 'Custom Messaging':
-
Provision Connector and Number in Admin Console
- a. Add a new Connector - Register your connector application by specifying the 'Webhook URL' to receive callback events from Avaya Infinity™ platform.Generate 'Client Credentials' for your connector for it to be able to send messages to Avaya Infinity™ platform.
- b. Configure a Number - Associate the SMS number with the Connector and define the routing configuration for the number.
-
Generate Access Token
Using the 'Client Credentials' (generated in step 1.a), generate an access token by calling the 'Generate Access Token' API endpoint.
-
Send End User Message to Contact Center
When your connector receives a new end user message from your provider, call the 'Send Message' API endpoint to send the message to Avaya Infinity™ platform. Use the 'accessToken' (generated in the previous step), the 'connectorId' (generated in step 1.a) and the 'number' (configured in step 1.b) as the destination along with other details to call the API.
-
Receive Messages from Contact Center and send to End User
When the contact center (workflows or agents) sends a message to the end user, Avaya Infinity™ platform will send a webhook callback event to the configured webhook URL of your connector application. On receiving the event, your connector application can forward the message to the third-party messaging provider.
In the following sections, we will go through the steps in detail.
Admin Configuration
To register your connector application with Avaya Infinity™ platform, you will need to add a new 'Connector' and configure your business SMS numbers (the numbers to which your end users will be sending messages to) in the Admin Console.
Adding a Connector
An Admin can add a new Connector by following the steps below:
-
Login to the Admin Console, click the 'CX' menu and select 'Custom Connector' from the left sidebar. Alternatively, click the 'Custom Connector' link under the 'CX Management' card in the 'Home' page.
-
Click the
Create Connectorbutton. -
Provide the following details:
Connector Name- Provide a user friendly name for the Connector.Connector Type- SelectTextfrom the dropdown.Webhook Callback URL- Provide theWebhook URLof your Connector application that will receive the callback events from Avaya Infinity™ platform.
-
Click the
Createbutton to add the new Connector. You will be redirected to the Connector details page. -
(Optional) Edit the
Connector Informationpanel to update the following details:Secret Key- Provide a webhook secret to secure the webhook.Subscribed Events- Select the events you want to subscribe to. Currently there are two options:Contact Center Messages- Callback events will be sent to theWebhook Callback URLfor any messages sent from the contact center (workflows or agents) to the end user.All Messages- Callback events will be sent to theWebhook Callback URLfor any messages sent from the contact center (workflows or agents) to the end user or from the end user to the contact center (workflows or agents).
-
Click the
Savebutton to update the Connector details. -
The Webhook URL can be tested by clicking the
Validate URLbutton. This will send an event with typehealth_checkto the Webhook Callback URL of your Connector application to verify if the URL is reachable. It expects a 200 OK response from your Connector application. Note that the event will be sent with the signature generated with theSecret Keyconfigured in the Connector details. -
Generate the Client Credentials by clicking the 'Generate' button on the 'Connector Credentials' panel. The
Client IdandClient Secretfields will appear. -
Copy the
Client Idby clicking the 'Copy' button next to theClient Idfield. -
Copy the
Client Secretby first clicking on the 'Get Secret' button and then clicking the 'Copy' button next to theClient Secretfield. -
Once the connector is created, go back to the
Custom Connectorpage where you will see the new Connector in the list. Copy theConnector Idmentioned against your Connector.
Configuring the SMS Number
An Admin must configure the SMS number that will be used to send and receive messages from the end user in the Avaya Infinity™ Admin Console by following the steps below:
-
Login to the Admin Console, click the
Voicemenu and selectNumbersfrom the left sidebar. Alternatively, click the 'Numbers' link under the 'Voice' card in the 'Home' page. -
Click on the '+' button to add a new number or search and select an existing number.
-
Edit the
Text Connectorpanel to update the following fields:- Toggle the
Textswitch to enable text messaging for the number - Select the Connector created in the previous step from the 'Select Text Connector' dropdown
- Select a Message Route To option from the dropdown
Workflow- The message will be routed to the workflow specified in the 'Message Route Data' field.Queue- The message will be routed to the queue specified in the 'Message Route Data' field.User- The message will be routed to the agent specified in the 'Message Route Data' field.
- Provide the 'Message Route Data' for the selected 'Message Route To' option.
- For
Workflow, select the name of the workflow to route the message. Also provide the workflow version in 'Message route Workflow Version' field. - For
Queue, provide the name of the queue to route the message. - For
User, select the name of the agent to route the message.
- For
- Toggle the
-
Click the 'Save' button to update the number details.
[!IMPORTANT]
- These routing configurations are applicable only for end user messages coming into the contact center that will create a new conversation session.
- Queues that are involved in routing the SMS conversation session must have
Send Text Messagesoption enabled to handle incoming messages from the end user.
API Authentication
To make API calls to Avaya Infinity™ for sending the end user message, an access token is required. The 'Generate Access Token' API endpoint needs to be invoked for this purpose.
Generate Access Token API
POST https://{{avaya-infinity-hostname}}/auth/realms/avaya/protocol/openid-connect/tokenParameters
| Field | Type | Required | Description |
|---|---|---|---|
| grant_type | string | Yes | Always set to client_credentials |
| client_id | string | Yes | The Client Id generated while configuring the connector |
| client_secret | string | Yes | The Client Secret generated while configuring the connector |
cURL Command
curl -X POST https://{{avaya-infinity-hostname}}/auth/realms/avaya/protocol/openid-connect/token \
-H "Content-Type: application/x-www-form-urlencoded" \
-d "grant_type=client_credentials&client_id={{YOUR_CONNECTOR_CLIENT_ID}}&client_secret={{YOUR_CONNECTOR_CLIENT_SECRET}}"
The API will return an access token in the response. The response also contains the expires_in field which indicates the number of seconds the access token is valid for. Usually it is valid for 900 seconds (15 minutes). The access token is a JSON Web Token (JWT) and can be decoded to get the actual expiry time (in seconds since epoch) from the exp claim.
Your connector application must cache the access token and use it to invoke the 'Send Message' API endpoint until it expires.
In fact, in production environment, to ensure smooth operation without delays in message delivery, the connector must generate a new access token before it expires.
Sending a Message to Avaya Infinity™
When your connector receives a new message from your third-party messaging provider, it will need to call the 'Send Message' API endpoint to send the message to Avaya Infinity™ platform. The to number of your test/SMS message should be configured and associated with the Connector in the Admin Console (as described in the Admin Configuration section).
Here is an example cURL command to send a message:
curl -X POST https://{{avaya-infinity-hostname}}/api/v1/custom-messaging/send-message \
-H "Authorization: Bearer {{YOUR_ACCESS_TOKEN}}" \
-H "Content-Type: application/json" \
-d '{
  "connectorId": "{{YOUR_CONNECTOR_ID}}",
  "channel": "text",
  "headers": {
    "from": "{{END_USER_NUMBER}}",
    "to": [
      "{{YOUR_REGISTERED_NUMBER}}"
    ],
    "destination": "{{YOUR_REGISTERED_NUMBER}}"
  },
  "body": {
    "text": "{{END_USER_MESSAGE}}"
  }
}'
Expected response format:
{
  "messageId": "{{MESSAGE_ID}}",
  "conversationSessionId": "{{CONVERSATION_SESSION_ID}}",
  "connectorId": "{{YOUR_CONNECTOR_ID}}",
  "accountId": "{{ACCOUNT_ID}}",
  "channel": "text",
  "headers": {
    "from": "{{END_USER_NUMBER}}",
    "to": [
      "{{YOUR_REGISTERED_NUMBER}}"
    ],
    "destination": "{{YOUR_REGISTERED_NUMBER}}"
  },
  "body": {
    "text": "{{END_USER_MESSAGE}}"
  }
}
Routing the Message
When Avaya Infinity™ platform receives the message, it will determine if the message needs to be part of a new or existing conversation session based on fields like connectorId, channel, headers.from and headers.destination. If a new conversation session is created, the interaction will be routed according to the routing policies configured for the headers.destination field.
Passing Context Information to the Workflow
The optional field contextParameters can be used to pass additional data to the workflow. For example, in the below example, the value of key1 can be accessed in a workflow as source.contextParameters.key1.
curl -X POST https://{{avaya-infinity-hostname}}/api/v1/custom-messaging/send-message \
-H "Authorization: Bearer {{YOUR_ACCESS_TOKEN}}" \
-H "Content-Type: application/json" \
-d '{
  "connectorId": "{{YOUR_CONNECTOR_ID}}",
  "channel": "text",
  "headers": {
    "from": "{{END_USER_NUMBER}}",
    "to": [
      "{{YOUR_REGISTERED_NUMBER}}"
    ],
    "destination": "{{YOUR_REGISTERED_NUMBER}}"
  },
  "body": {
    "text": "{{END_USER_MESSAGE}}"
  },
  "contextParameters": {
    "key1": "value1"
  },
}'
Correlating the Messages
The 'Send Message' API endpoint returns the messageId and conversationSessionId fields in the response.
These fields also appear in message events when end user messages are added to a conversation session provided the connector is configured to subscribe to the All Messages event. You can use these fields to track requests and correlate conversation sessions.
Handling MMS Messages
In Avaya Infinity™ platform, support for MMS is not yet available.
If your end user is sending MMS, your connector should handle it appropriately. Few options are:
- Only forward the text part of the MMS as a SMS to Avaya Infinity.
- Upload the Media content to a file storage service and send the link as a SMS to Avaya Infinity. Make sure the link is accessible to agents.
- Drop the MMS and send an error message to the end user stating that MMS is not supported.
Receiving a Message from Avaya Infinity™
There are broadly two scenarios when the Contact Center might want to send a message to the end user:
- The Agent or Workflow respond to the end user message in a conversation session
- The Agent or Workflow send an ad-hoc message to the end user
Avaya Infinity™ platform will send a webhook callback event to the Webhook Callback URL of your connector application when the message is added in a conversation session in the Avaya Infinity™ platform provided the connector is configured to subscribe to the All Messages event.
[!IMPORTANT]
If the end user is being responded to on a conversation session that came via a 'Queue', the queue must have
Send Text Messagesoption enabled. Otherwise the message will not be sent to the end user.
Here is an example of an event containing a message from the contact center to the end user:
{
  "eventType": "messages",
  "eventId": "9a68394c-46ca-43b0-8d7a-c0511c7dbe84",
  "eventTimestamp": "2025-09-14T17:03:14.973161008Z",
  "messageId": "049d01091481a36c2dfd6f3f4e",
  "accountId": "001d0106666c6888cc999c111c",
  "conversationSessionId": "028d0109148d0c42be45266207",
  "connectorId": "a2a22a22-b66b-4444-a9a9-dd111d111d11",
  "channel": "text",
  "headers": {
    "from": "+912121212121",
    "to": [
      "+18777777777"
    ]
  },
  "body": {
    "text": "Thanks for contacting us. We have received your query. We will connect back with you in 4 hours."
  },
  "sender": {
    "type": "bot"
  }
}
Detailed descriptions of the fields in the webhook callback event are provided in the Webhook Event Payload Definitions section.
Webhook Callback Requests
To receive events from Avaya Infinity™ platform, your connector application must do the following:
- Expose a webhook endpoint that accepts POST requests with event payloads defined in the below section.
- This endpoint must be registered as the
Webhook Callback URLin the Connector details in the Avaya Infinity™ Admin Console. - The endpoint must be accessible from the internet. Alternatively, services like ngrok can be used to test the webhook endpoint locally.
- After processing the event, the connector application must respond with a 200 OK response to the Avaya Infinity™.
If your connector application fails to process the event and returns an error response, based on the error response code, Avaya Infinity™ platform will retry sending the request with exponential backoff. After a certain number of retries, the event will be dropped and no further retries will be attempted.
Here is the list of retriable error response codes:
- 408 Request Timeout
- 429 Too Many Requests
- 5xx Server Errors
Webhook Event Payload Definitions
Health Check Event
Avaya Infinity™ platform will send a health check event to the configured Webhook Callback URL of your connector to verify if the webhook endpoint is reachable. If the webhook endpoint is not reachable or the connector application returns an error response, Avaya Infinity™ platform will mark the webhook endpoint as disabled. The admin must validate the webhook URL again after fixing the issue to enable the webhook endpoint again. Hence it is mandatory for the connector application to handle the health check event.
Health Check Event: Payload Definition
| Field | Type | Required | Description |
|---|---|---|---|
| eventType | string | Yes | The event type. Must be health_check |
| eventId | string | Yes | The unique identifier for the event |
| eventTimestamp | string | Yes | The timestamp of the event in ISO 8601 Format: YYYY-MM-DDTHH:MM:SS.sssZ |
| accountId | string | Yes | The account Id. |
| connectorId | string | Yes | The connector Id. |
Health Check Event: Payload Examples
{
  "eventType": "health_check",
  "eventId": "7ebffbb2-3ec0-4f03-a17e-46c9c2608338",
  "eventTimestamp": "2025-09-14T16:49:22.219Z",
  "accountId": "001d0106666c6888cc999c111c",
  "connectorId": "a2a22a22-b66b-4444-a9a9-dd111d111d11"
}
Messages Event
Avaya Infinity™ platform will send a webhook callback event to the Webhook Callback URL of your connector application when the message is added in a conversation session. The message can be either be a Contact Center message or an end user message.
Messages Event: Payload Definition
| Field | Type | Required | Description |
|---|---|---|---|
| eventType | string | Yes | The event type. Must be messages |
| eventId | string | Yes | The unique identifier for the event |
| eventTimestamp | string | Yes | The timestamp of the event in ISO 8601 Format: YYYY-MM-DDTHH:MM:SS.sssZ |
| messageId | string | Yes | The unique identifier for the message |
| accountId | string | Yes | The account Id. |
| conversationSessionId | string | Yes | The conversation session Id. |
| connectorId | string | Yes | The connector Id. |
| channel | string | Yes | The channel of the message. Must be text |
| headers | Headers Object | Yes | The headers of the message |
| body | Body Object | Yes | The body of the message |
| sender | Sender Object | Yes | The sender of the message |
Headers Object
| Field | Type | Required | Description |
|---|---|---|---|
| from | string | Yes | The from number of the message |
| to | array of strings | Yes | The to numbers of the message |
Body Object
| Field | Type | Required | Description |
|---|---|---|---|
| text | string | Yes | The text of the message |
Sender Object
| Field | Type | Required | Description |
|---|---|---|---|
| type | string | Yes | The type of the sender. Must be agent or bot or customer |
Event Payload Examples
Message Event: Agent Message
{
  "eventType": "messages",
  "eventId": "9a68394c-46ca-43b0-8d7a-c0511c7dbe84",
  "eventTimestamp": "2025-09-14T17:03:14.973Z",
  "messageId": "049d01091481a36c2dfd6f3f4e",
  "accountId": "001d0106666c6888cc999c111c",
  "conversationSessionId": "028d0109148d0c42be45266207",
  "connectorId": "a2a22a22-b66b-4444-a9a9-dd111d111d11",
  "channel": "text",
  "headers": {
    "from": "+912121212121",
    "to": [
      "+18777777777"
    ]
  },
  "body": {
    "text": "Hi I have processed your request. Changes will take affect in an hour."
  },
  "sender": {
    "type": "agent"
  }
}
Message Event: Workflow Message
{
  "eventType": "messages",
  "eventId": "9a68394c-46ca-43b0-8d7a-c0511c7dbe84",
  "eventTimestamp": "2025-09-14T17:03:14.973Z",
  "messageId": "049d01091481a36c2dfd6f3f4e",
  "accountId": "001d0106666c6888cc999c111c",
  "conversationSessionId": "028d0109148d0c42be45266207",
  "connectorId": "a2a22a22-b66b-4444-a9a9-dd111d111d11",
  "channel": "text",
  "headers": {
    "from": "+912121212121",
    "to": [
      "+18777777777"
    ]
  },
  "body": {
    "text": "Thanks for contacting us. We have received your query. We will connect back with you in 4 hours."
  },
  "sender": {
    "type": "bot"
  }
}
Message Event: End User Message
{
  "eventType": "messages",
  "eventId": "a8b98284-0eac-4b31-a7d5-e0646d4e4a09",
  "eventTimestamp": "2025-09-14T17:03:14.802Z",
  "messageId": "049d010914c32d7fc2f7e966ae",
  "accountId": "001d0106666c6888cc999c111c",
  "conversationSessionId": "016d010914374550b2a306fefb",
  "connectorId": "a2a22a22-b66b-4444-a9a9-dd111d111d11",
  "channel": "text",
  "headers": {
    "from": "+18777777777",
    "to": [
      "+912121212121"
    ]
  },
  "body": {
    "text": "mock message from twilio 10"
  },
  "sender": {
    "type": "customer"
  }
}
Securing Webhook
The authenticity of the webhook callback event can be verified by setting a webhook Webhook Secret in the connector details in the Admin Console. If the Secret Key is set, Avaya Infinity™ platform will use it to create a signature of the event payload and include the signature in the x-avaya-event-signature header of the callback request.
Here are the steps to generate the signature:
- Create a HMAC-SHA256 hash of the event payload using the webhook
Secret Keyas the key. - Base64 encode the hash.
- Prefix the hash with
sha256=.
On receiving the callback request, your connector application can verify the signature of the event by regenerating the signature using the same steps and compare it with the x-avaya-event-signature header. If the signatures do not match, the callback request should be rejected.
Here is an example of how to generate the signature and verify the event payload:
// Generate the signature
const hmac = crypto.createHmac('sha256', webhookSecret);
hmac.update(JSON.stringify(req.body), 'utf8');
const generatedHmac = "sha256=" + hmac.digest('base64');

// compare the generatedHmac with the x-avaya-event-signature header
if (generatedHmac !== req.headers['x-avaya-event-signature']) {
    return res.status(401).send('Unauthorized');
}
Sample Application
To demonstrate how the 'Custom Messaging' APIs can be used to integrate third-party SMS providers, we have created a sample application that can be used as a reference to build your own connector application. This sample application is a simple Node.js application that integrates with the Twilio as the third-party SMS provider. For convenience, it also has a Twilio mock mode so that you can test the application without the need of a Twilio account.
The sample application is available in the avaya-infinity-twilio-sms-connector directory of the Avaya Infinity™ Sample Applications Repository. Detailed instructions to run the application are available in the README file.
Updated 3 months ago